Image prompt: Photorealistic 3:2 photo of a 27-inch monitor on a dark wooden desk showing a dark-themed video editor: a large preview of a mountain lake at sunset, and below it a multi-track timeline with a blue video clip, a green audio waveform and a purple title clip. A mechanical keyboard, a mouse and over-ear headphones on a stand sit beside it, with a soft lime-green LED glow behind the monitor. Shot from slightly above at a three-quarter angle, shallow depth of field, evening light, no text or logos on the screen. Remove this caption line before publishing.
Most free video editors have a catch. You finish your edit, press Export, and then a watermark appears, or 4K suddenly needs a subscription. Concat is built to avoid all of that.
It is open source, it runs on your own computer, and it still has the tools people actually open an editor for: auto-captions, voiceovers, background removal and 4K export. This guide walks through the app with real screenshots and explains what each screen does.
What is Concat?
Concat is a free desktop video editor for Windows, macOS and Linux, with an Android version too. It is open source under the AGPL-3.0-or-later license, which means anyone can read the code and the project cannot suddenly lock features behind a paywall.
Under the hood it uses a native engine written in Rust, with the GPU doing the heavy lifting for the preview. The project says everything is processed locally, so your footage never leaves your disk.
One honest note: Concat is still in beta. It works, and the developers say openly that it still has rough edges. At the time of writing, the newest release is version 0.2.11, published on 13 November. The screenshots in this guide come from version 0.2.8, so small details may look a little different on your screen.
What you get, in plain words
Here is what the project lists as its main features, translated into everyday language:
- Auto-captions. Concat listens to your video with a local speech model (Whisper) and puts styled subtitles on the timeline.
- Text-to-speech and voice cloning. Turn typed text into a voiceover, or copy a voice from a short recording.
- Background removal. Cut a person or an object out of a clip. You can also paint the mask yourself.
- Keyframes. Animate position, scale, rotation, opacity and volume over time, with a built-in curve editor.
- About 100 effects, filters and transitions. They are drawn by the GPU, so you see them live in the preview.
- Multi-track timeline. Stack video, images and titles on as many tracks as you like, and keep several cuts in one project.
- One-switch voice cleanup. Reduce noise, enhance a voice and even out the loudness.
- Export in H.264, HEVC or AV1, up to 4K at 60 frames per second, with optional 10-bit colour.
- Scriptable. A built-in MCP server and a JSON-RPC API let scripts and AI agents edit video with it. Most people will never need this, but it is a nice extra.
How to download and install it
The easiest way is the official website at concatenate.pages.dev. It offers the right build for your computer. If you prefer to pick the file yourself, every build is on the GitHub Releases page, together with checksums.
- Windows: 64-bit (x86_64). There is a setup file and an .msi installer. Windows ARM builds are currently paused.
- macOS: open the .dmg and drag Concat to Applications. Both Intel and Apple silicon are supported.
- Linux: .deb, .rpm, .AppImage and an Arch package, for x86_64 and ARM.
The Windows and macOS builds are not signed yet, so your system may show a warning the first time. On Windows, click More info and then Run anyway. On macOS, if the app is refused, the project documents a Terminal command to remove the quarantine flag. Only do this with a file you downloaded from the official sources above.
The Home screen
When you open Concat, you land on a dark Welcome screen. It is a launchpad, so nothing here edits video yet.
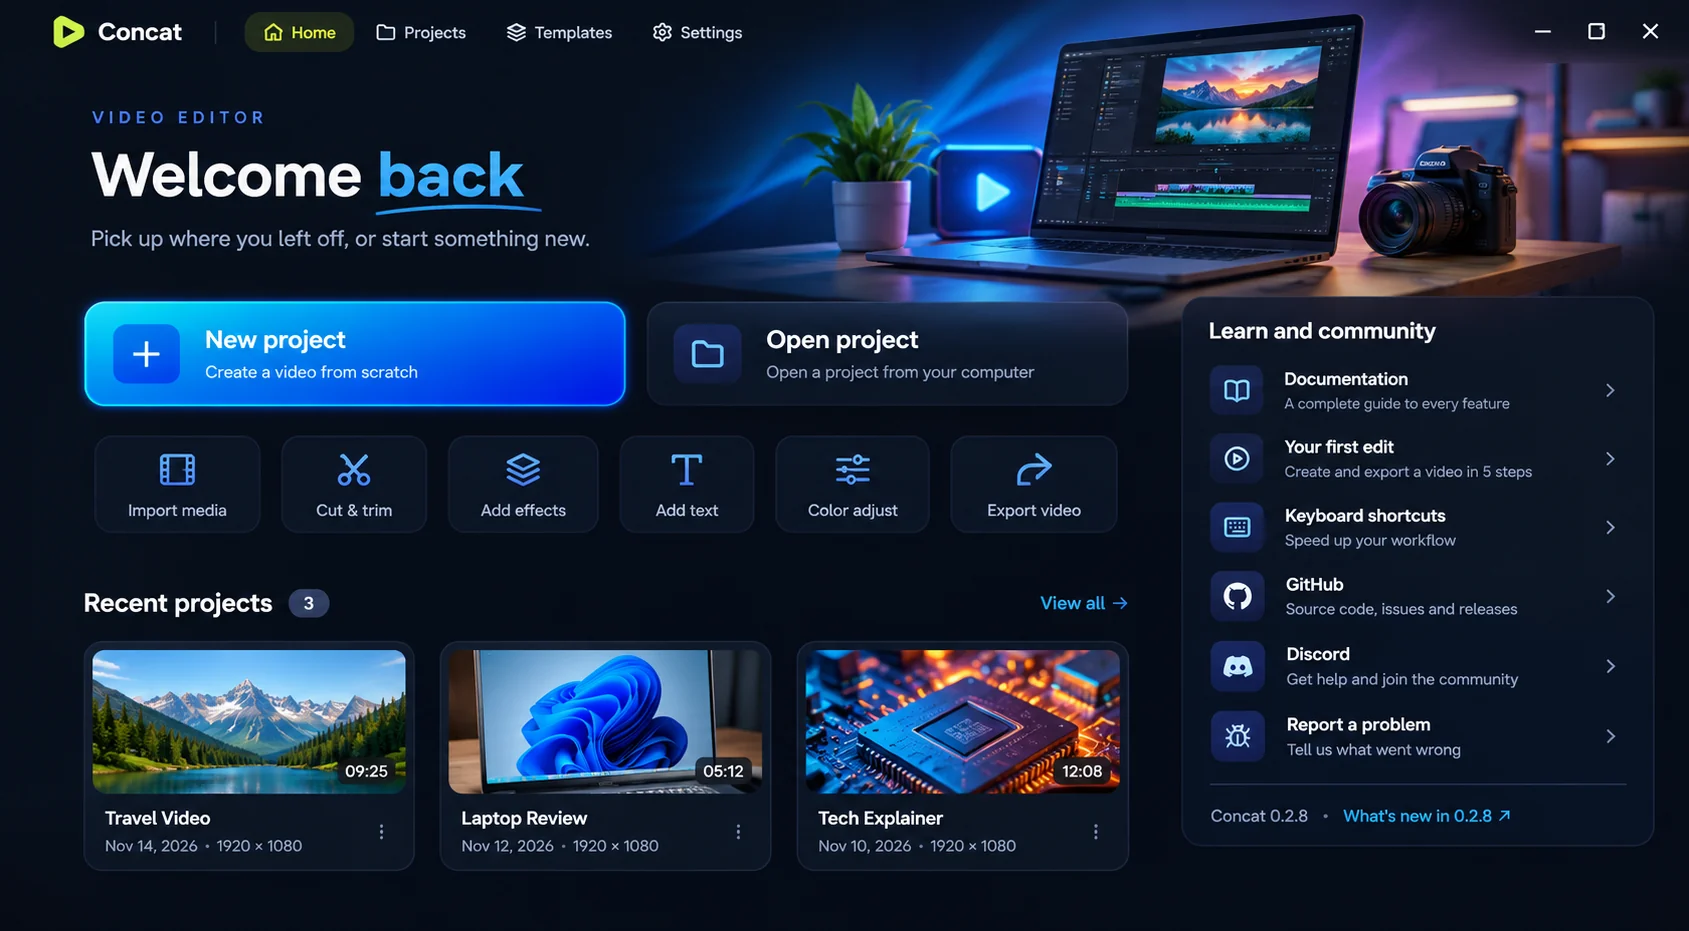
The Concat Home screen: start a project, reopen a recent one, or jump to the help links.
Here is what you can do on this screen:
- Top menu: Home, Projects, Templates and Settings. Settings is also where you download the optional AI models later.
- New project (the big blue button) starts a video from scratch. Open project loads a project file from your computer.
- The six quick tiles (Import media, Cut & trim, Add effects, Add text, Color adjust and Export video) are shortcuts that remind you of the usual editing order.
- Recent projects shows your latest work with a thumbnail, the video length, the date and the resolution, so you can continue where you left off.
- Learn and community on the right links to the documentation, a five-step first-edit guide, keyboard shortcuts, GitHub, Discord and a bug-report button. The version number sits at the bottom of that panel.
If you are new to video editing, start with the “Your first edit” link. It is a short guide that takes you from import to export.
The main editor, panel by panel
Click New project and you get the real workspace. If you have used CapCut, Premiere or DaVinci Resolve, the layout will feel familiar.
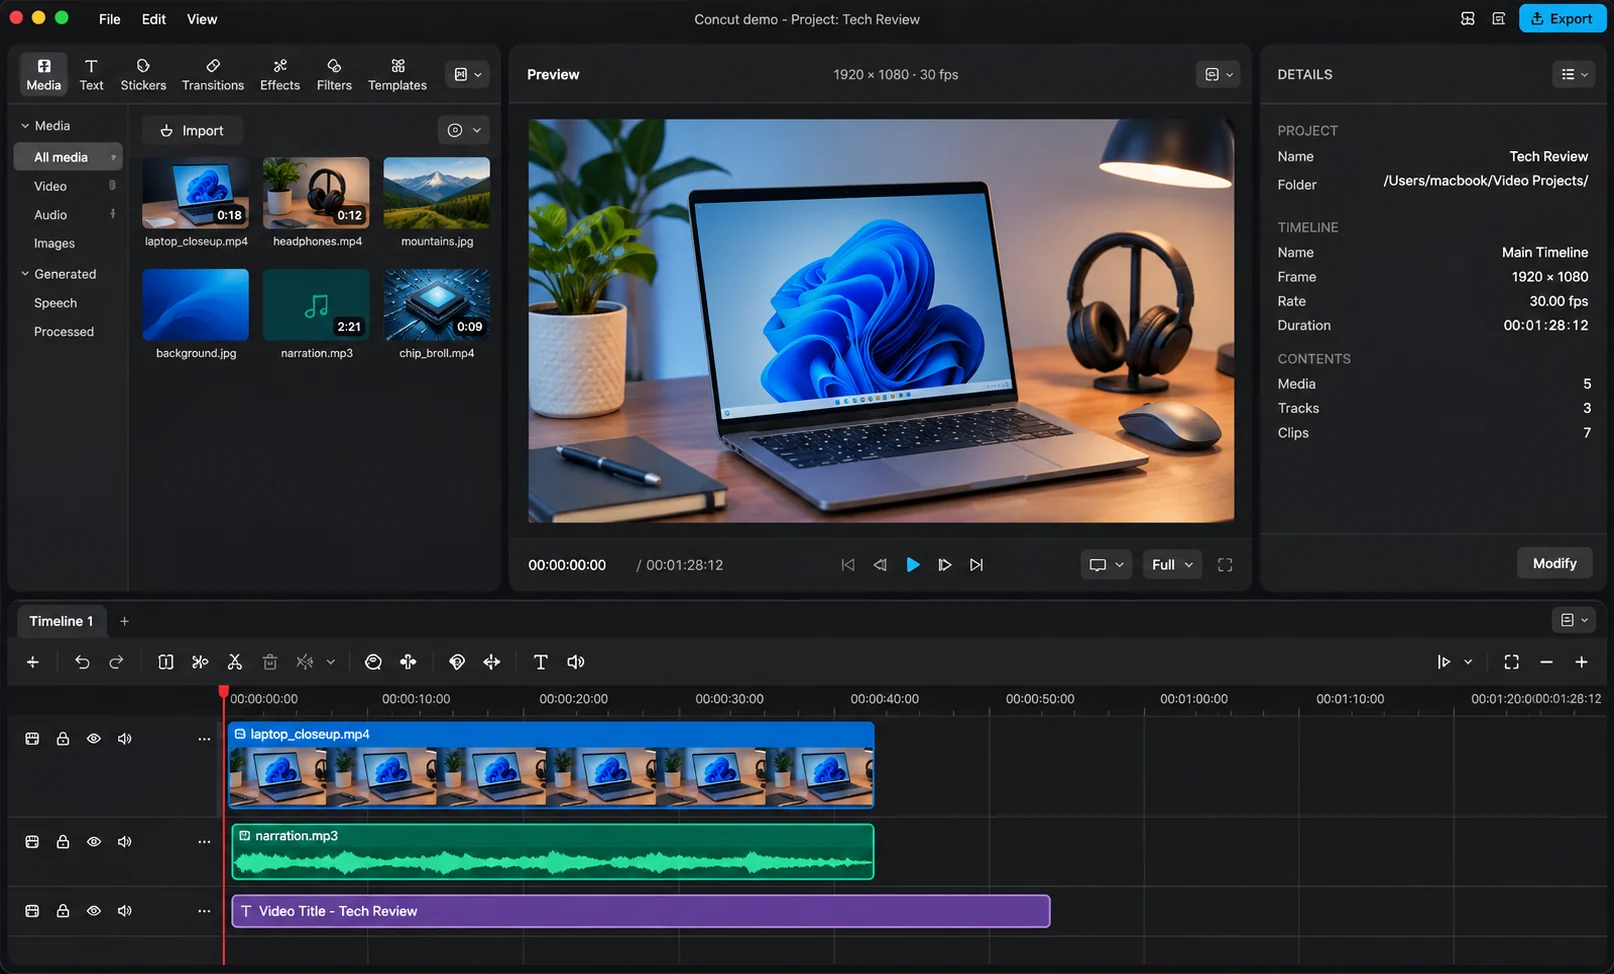
The main workspace: library on the left, preview in the middle, details on the right, timeline at the bottom.
Left: the media library
The tabs at the top (Media, Text, Stickers, Transitions, Effects, Filters and Templates) are your toolbox. In the Media tab you see everything you imported: videos, audio files and images. The Import button adds new files, and the list on the left lets you filter by All media, Video, Audio or Images. The Generated section holds files Concat creates for you, such as speech and processed clips.
Centre: the preview
This is your player. It shows the project size and frame rate (here 1920 × 1080 at 30 fps), the current time and the total length, plus play and frame-step buttons. The quality menu next to them (Full in this screenshot) lets you lower the preview quality if your computer struggles.
Right: the Details panel
With nothing selected, this panel shows the project name, its folder, the timeline settings (frame size, frame rate and duration) and how many tracks and clips you used. Select a clip and the same area turns into its settings panel, which you will see in the next screenshots.
Bottom: the timeline
Each row is a track. In this example the blue bar is a video clip, the green one is an audio track with its waveform, and the purple one is a title. The icons on the left of each row let you lock a track, hide it or mute it. The toolbar above the tracks holds undo and redo, split, trim, delete and zoom controls.
Captions, voices and background removal
These are the “smart” tools, and they are the main reason people look for a CapCut replacement. In Concat they run on your own machine instead of in the cloud.
The AI models are not bundled with the installer. You download them once from Settings, and after that they work without an internet connection. This keeps the app itself small and lets you choose what you really need.
- Captions: pick a model size, let Concat transcribe the speech, and you get styled subtitles on the timeline. A bigger model is usually more accurate but slower.
- Voices: free local text-to-speech voices are included, and voice cloning can copy a voice from a few seconds of a recording. Only clone a voice you have permission to use.
- Background removal: remove a person or an object from the shot, or paint the mask by hand when the automatic result is not perfect.
Fixing and shaping your audio
Select an audio clip on the timeline and the right panel switches to audio controls. In this screenshot the selected clip is a voice recording called voice-sample.wav.
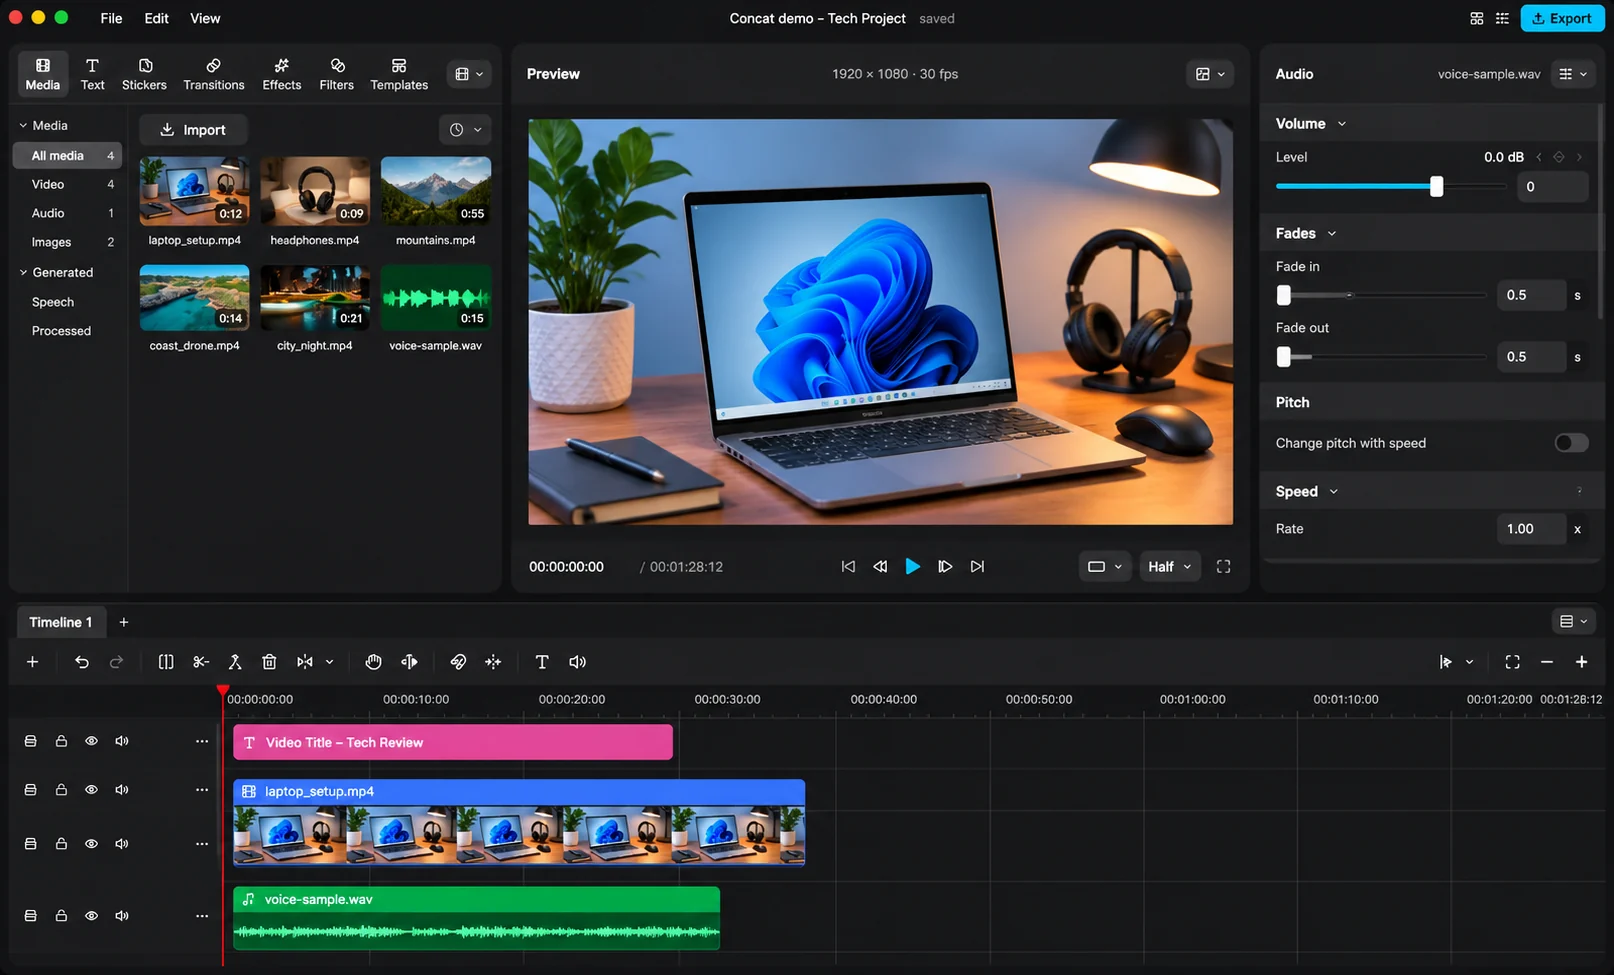
The audio panel for a selected voice clip: volume, fades, pitch and speed.
- Volume: a slider and a number in decibels (dB). 0.0 dB means the original level. Drag the slider down to make the clip quieter or up to make it louder.
- Fades: Fade in and Fade out set how many seconds the sound takes to rise from silence or fall back to it. Half a second, as shown here, removes harsh starts and cut-offs.
- Pitch: the switch “Change pitch with speed” decides what happens when you change the speed. Off keeps the voice natural, on makes it sound higher when faster, like a sped-up tape.
- Speed: the Rate field changes the clip speed. 1.00x is normal, 2.00x is twice as fast.
Concat also has a one-switch voice cleanup for noise and loudness, plus fun voice filters such as robot or telephone. These are good for quick fixes when you record with a basic microphone.
Moving, scaling and decorating a clip
Click a video clip and the right panel gives you Video, Audio and Effects tabs. Under Video there are three sub-tabs: Basic, Enhance and Adjust. The screenshot below shows the Basic tab.
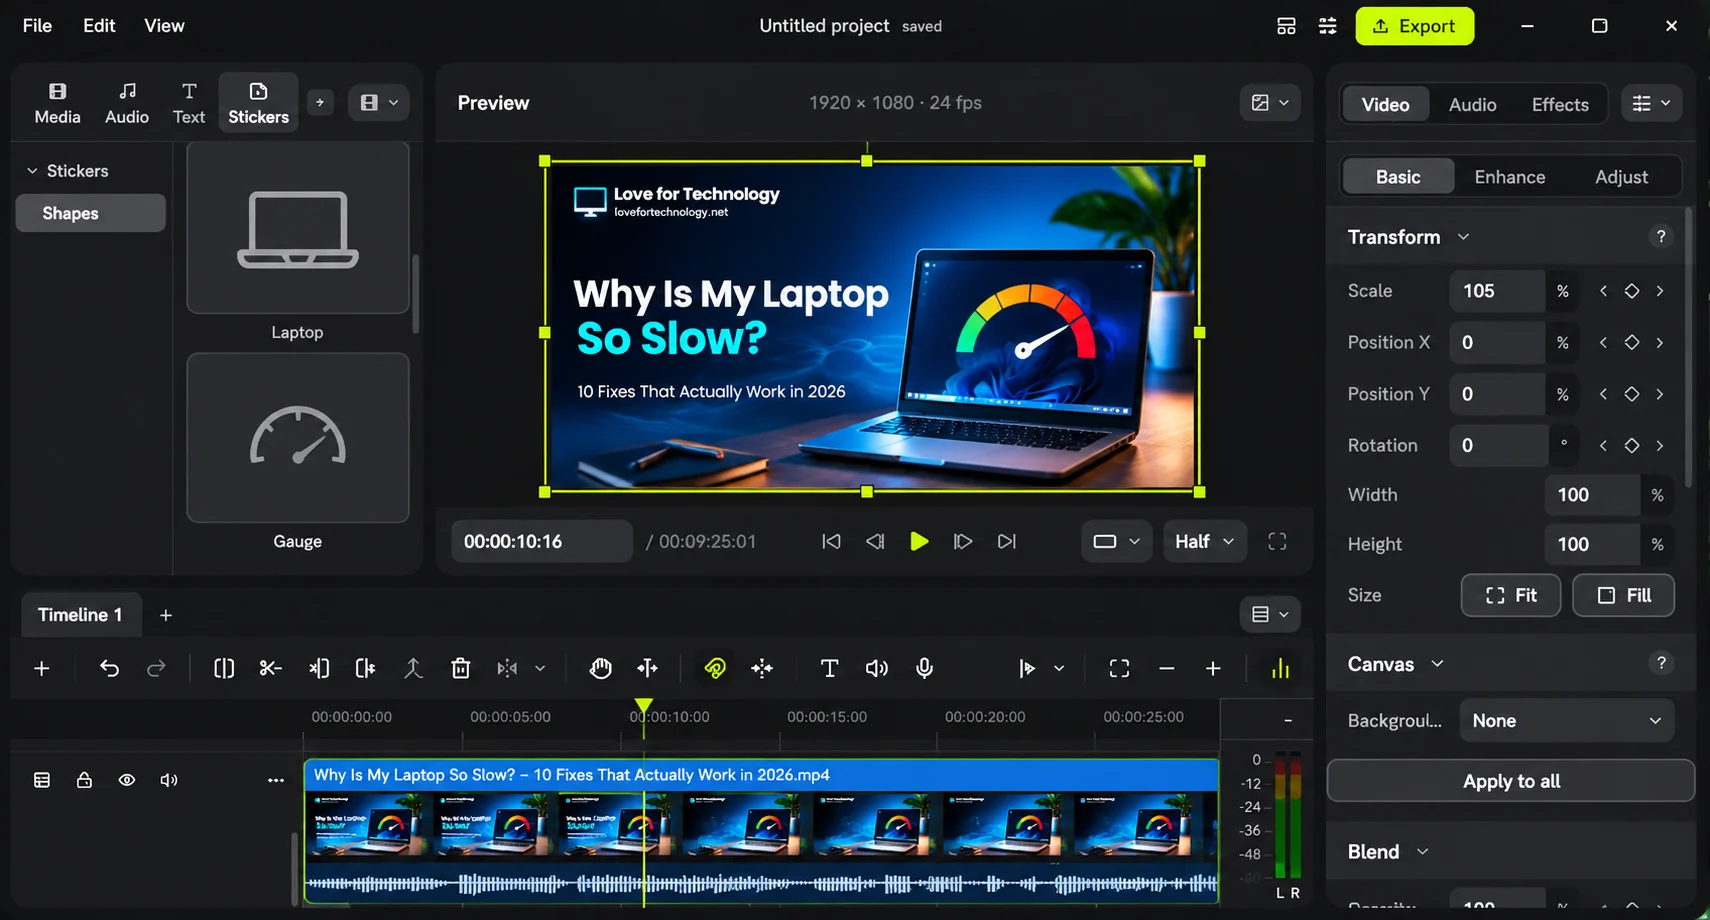
The Transform controls for a selected clip, with the Stickers library open on the left.
- Transform: Scale, Position X, Position Y and Rotation move and resize the clip. In this example Scale is 105%, a small zoom that pushes the edges of the picture out of view. The yellow handles in the preview let you do the same with the mouse.
- Width, Height and Size: set the clip size by percentage, or press Fit to fit the whole picture inside the frame, or Fill to cover the whole frame.
- Canvas: sets what shows behind a clip that does not fill the screen. Here Background is set to None, and Apply to all copies the setting to every clip.
- Blend: further down the panel, blend modes decide how a clip mixes with the layer below it, which is handy for overlays.
- Stickers: the library on the left has a Shapes page with ready-made items such as a laptop and a gauge that you can drop onto the video.
The small diamond next to each value is the keyframe button. Click it, move to another point in time, change the value, and Concat animates the change in between.
Exporting your video
When the edit is ready, press the Export button in the top-right corner. A summary window opens where you choose how the final file is made.
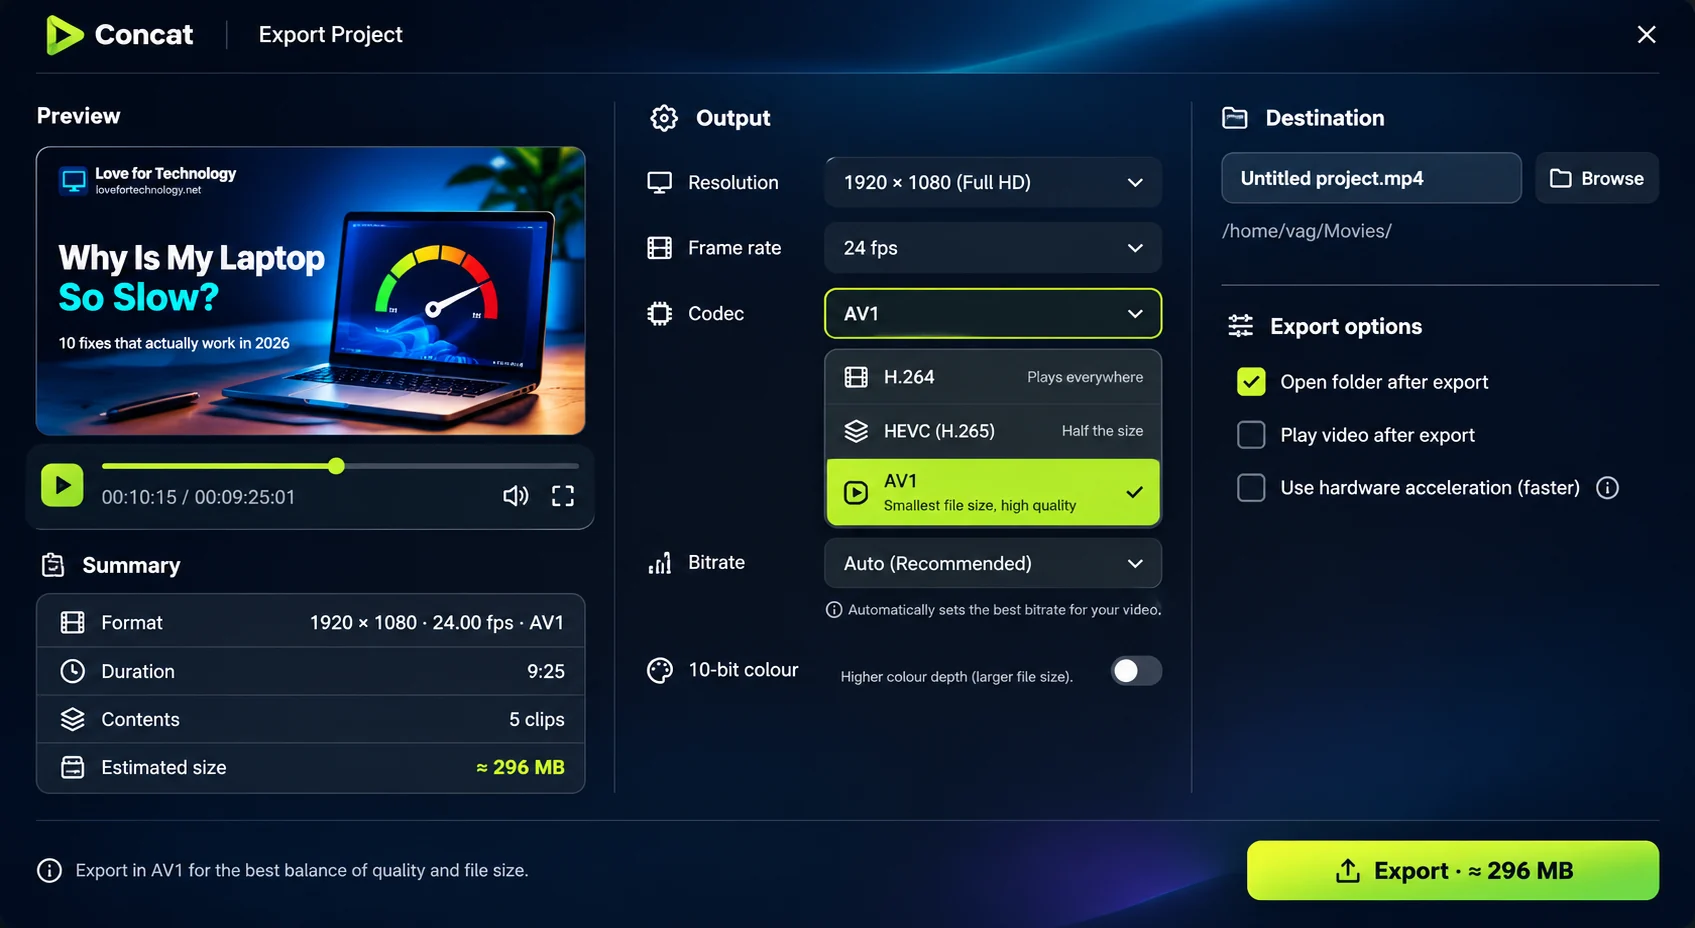
The Export Project window with the codec list open.
- Preview and Summary (left): a small player to check the result, plus the final format, duration, number of clips and the estimated file size. For a 9 minute 25 second video the estimate here is about 296 MB.
- Resolution and Frame rate: in the screenshot they follow the project, 1920 × 1080 (Full HD) at 24 fps. Concat can go up to 4K at 60 fps.
- Codec: a codec is the method used to compress the video. H.264 “plays everywhere”, HEVC (H.265) makes files about half the size, and AV1 gives the smallest files at high quality.
- Bitrate: leave it on Auto (Recommended) unless you know exactly what you need.
- 10-bit colour: a higher colour depth for smoother gradients. It makes the file bigger, so keep it off for normal uploads.
- Destination: the file name and folder. Press Browse to change the folder.
- Export options: tick “Open folder after export” to find the file quickly, or “Play video after export” to watch it at once. “Use hardware acceleration (faster)” asks your graphics card to do the encoding. The project lists NVIDIA NVENC, Intel Quick Sync and AMD AMF support for HEVC and AV1 on Windows and Linux.
As a rule, choose H.264 if the video must play on any phone or TV, and AV1 if you want the smallest file and your devices can play it.
Concat vs CapCut
Concat is often described as an open alternative to CapCut. Here is a fair side-by-side, based on what the two projects state about themselves at the time of writing:
| Concat | CapCut | |
|---|---|---|
| Price | Free, no paid tier | Free plan with paid options |
| Source code | Open (AGPL-3.0-or-later) | Closed |
| Watermark or export paywall | None, by the project’s own promise | Depends on the version and plan |
| Where your footage is processed | On your computer | Some tools use online processing |
| Internet needed | Only to download AI models once | Some tools need a connection |
| Templates and music | Limited | Large library |
| Maturity | Beta, still has rough edges | Mature |
In short: Concat wins on freedom and privacy, CapCut wins on polish and ready-made content. If you mostly want clean cuts, captions and a good export, Concat is already enough. If you rely on trending templates and stock music, you will miss them.
Things to know before you start
- It is a beta. Save often, and keep a copy of important projects. Report bugs on GitHub, because that is how the project improves.
- Unsigned builds. You may see a Windows SmartScreen or macOS warning. This is expected for now, so download only from the official website or GitHub Releases.
- Windows ARM is paused. If you use a Windows ARM laptop, check the project page before you try.
- The AI models take disk space. Download only the sizes you need.
- The AGPL license is friendly for personal and creator use. It matters mostly if you plan to build a commercial service on top of Concat’s code.
Quick tips
- Start a project with the same resolution and frame rate as your main clip, so the preview matches your footage.
- Download the AI models from Settings while you still have internet. After that, you can edit anywhere.
- Pick a smaller captions model first. If the subtitles contain too many mistakes, try a bigger one.
- Add a fade in and fade out of about half a second to voiceovers and music. It makes the sound feel professional.
- Export with H.264 when you are unsure. Use AV1 only when you know the devices that will play the file.
- Turn on hardware acceleration if your graphics card supports it, and switch it off if you see any glitches in the result.
- Keep your media in one folder before you import it, so a moved file does not break the project.
FAQ
Is Concat really free, and does it add a watermark?
Yes. Concat is free and open source under the AGPL-3.0-or-later license. The project says there is no watermark, no account and no paid tier, and that 4K export is not locked behind a subscription.
Does Concat work offline?
Yes. Editing happens on your own computer and your footage is not uploaded. The AI models for captions, voices and background removal are downloaded once from Settings, and after that they work offline.
Which platforms does Concat run on?
Concat has builds for Windows (x86_64), macOS (Intel and Apple silicon), Linux (x86_64 and ARM) and Android. Windows ARM builds are currently paused.
Why does Windows warn me when I open the installer?
The Windows builds are not code-signed yet, so SmartScreen can show a warning. Download Concat only from the official website or the GitHub Releases page, then choose More info and Run anyway if you trust the source.
Which export codec should I choose: H.264, HEVC or AV1?
Choose H.264 when the video must play on almost any device. HEVC makes smaller files, and AV1 gives the smallest files at high quality, but older devices may not play it smoothly.
💬 Comments