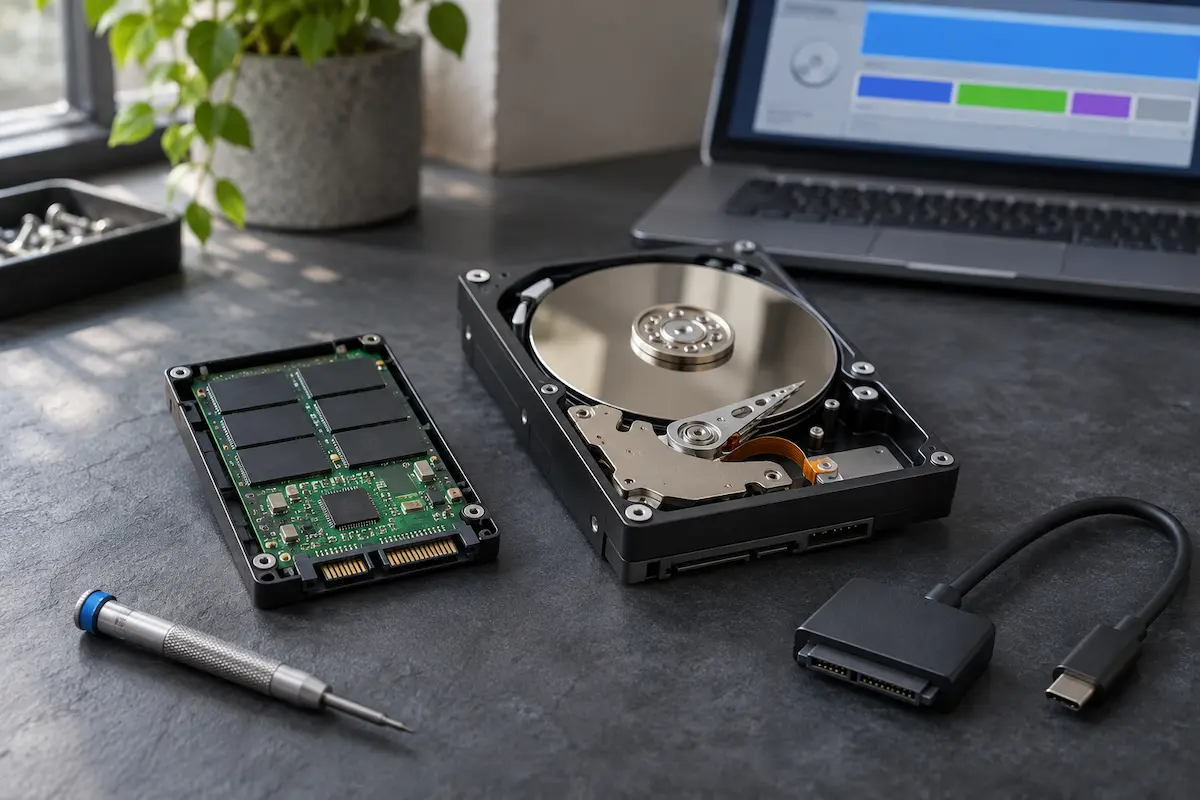
Search for a free partition manager and you will soon spot a pattern: the download is free, but the one feature you actually need sits behind a “Pro” button. FreePartition takes a different route. It is a free, open-source Windows app that manages your partitions and recovers deleted files in the same window, with no ads and no paid tier.
It is also very new. So this guide covers what it does, how to download it safely, where it works well and where an older, more battle-tested tool is the smarter choice.
Why FreePartition is worth a look
Most people meet partition software the same way. A drive is full, Windows’ built-in Disk Management can’t do what they need, and a quick search turns up a polished suite with a “free” label. Then comes the catch: some features, such as moving Windows to a new SSD or recovering files, are reserved for a paid plan.
FreePartition is a different kind of option. It is released under the MIT licence, which means its source code is public and anyone can inspect it. It also combines two jobs that usually need separate programs: managing partitions and recovering deleted files. According to the project’s privacy policy, it collects no data and makes no network connections.
It is a young project, though. The first alpha appeared in late October 2026 and version 0.1.0 followed in November. The developer, who publishes as rfiori on GitHub, calls 0.1.0 the first stable release and says every operation was tested on real disks. That is encouraging, but a project that appears to be built by a single developer deserves a careful first date. That is the angle of this guide.
What you get in the app
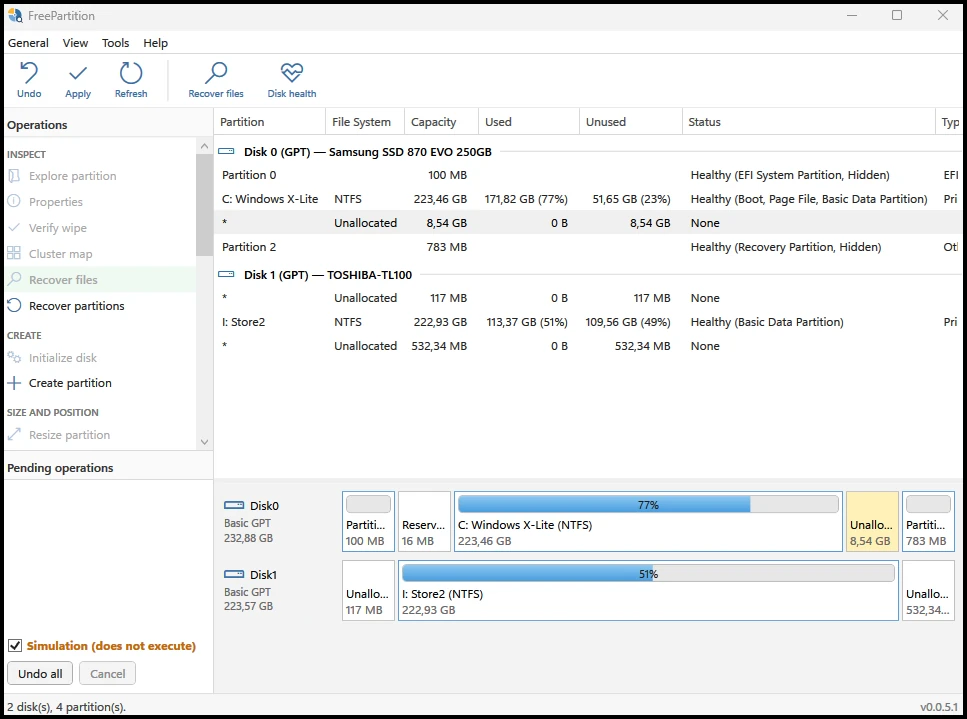
FreePartition runs on Windows 10 and Windows 11. The interface is in English and will feel familiar if you have used other disk managers: operations in a panel on the left, a toolbar along the top, your disks in the middle and a colour-coded map of each disk below.
Partition management
Create, resize, move, merge, split, format and clone partitions. Convert between FAT32 and NTFS, or between MBR and GPT, and check for 4 KB alignment.
File recovery
Scan NTFS drives for deleted files, or search FAT, exFAT and damaged drives by file signature. Preview before you recover, and find lost partitions too.
Health and wiping
Read-only S.M.A.R.T. and NVMe health reports, which are the self-checks drives report about themselves. Wipe free space, a partition or a whole disk when data must be gone for good.
There is one more feature worth knowing about. Version 0.1.0 can clone Windows to another disk from a bootable WinPE image, a small standalone Windows environment that comes as a separate ISO download. The release notes say the boot files and recovery partition are included. It is a separate, higher-risk job, so follow the project’s own step-by-step guide if you try it.
How to download it safely
Open-source tools have a risk that has nothing to do with their code: copies. Search results for popular utilities often include lookalike pages with a huge “Download” button. A few minutes of care here is worth more than any setting inside the app.
- Use the official page. Open the project’s Releases page on GitHub. New builds appear there first.
- Pick a build. There are two zip files. The self-contained one is larger, runs without installing anything and is the one the developer recommends. The smaller one needs the .NET Desktop Runtime 10 on your PC. A third download,
FreePartition-WinPE.iso(roughly 600 MB), is only for cloning Windows from outside Windows, so ignore it for everyday use. - Check the checksum. Each release includes a
SHA256SUMS.txtfile. Run the command below in PowerShell and compare the result with the matching line in that file. - Extract and run. The app asks for administrator rights because it needs direct access to your disks. Expect a UAC prompt on launch and click Yes.
- Expect a SmartScreen warning. The project says its builds are not code-signed yet, so Windows SmartScreen may warn you the first time. If you downloaded from the official Releases page and the checksum matches, choose More info, then Run anyway.
Example output. The hash you get must match the line for your file in SHA256SUMS.txt.
A matching checksum shows the file was not corrupted or swapped after upload. It cannot prove who made it, which is one more reason to stick to the official repository.
Recovering deleted files
This is the headline feature. Open it from the Tools menu or with the Recover files button on the toolbar, choose a drive and start a scan. The scan only reads the drive, and FreePartition will not let you save recovered files onto the same drive. That rule is deliberate: saving onto the drive you are rescuing can overwrite the very data you want back.
Two ways of finding your files
On NTFS drives, the app reads the Master File Table, which is the drive’s table of contents. Deleted entries are still listed there for a while, so you see them with their original names and folders, plus an estimate of the recovery chance for each one.
On FAT, exFAT and damaged NTFS drives, there is no usable table of contents. FreePartition falls back on carving: it searches the whole drive for the telltale opening bytes of known file types, such as JPEG, PNG, PDF, DOCX, ZIP, MP4 and a few more. It works, but the names are gone and files come back as carved_00001.jpg and so on.
Step by step
- Stop using the drive. Every new file you save is a chance to overwrite the old one.
- Start a scan. Choose the drive and begin. Carving reads the entire drive, so it is far slower than an NTFS scan. If you press Cancel, the app lists what it found so far.
- Narrow the list. Filter by name, type (pictures, documents, audio, video), size and modified date.
- Preview. Select a file to see the image, text or a hex dump before recovering anything. Nothing is written at this stage.
- Use Thumbnails. The Thumbnails button shows your pictures as a gallery. Click to tick one, drag across several, or Shift+click to pick a range.
- Recover to another drive. Choose a folder on a different drive. NTFS files keep their original folders, while carved files are grouped by type.
Image, 3.4 MB
An illustrative mockup. Wording and values in the real window may differ slightly.
What to expect from a formatted memory card
A quick-formatted SD card or USB stick is usually FAT32 or exFAT, which is exactly the case carving is built for. Scan it, open Thumbnails, tick the pictures you recognise and recover them to your PC. You will not get names or dates back, and a file that was stored in pieces is cut at the first gap, so it can come back incomplete.
Resizing, splitting and moving partitions
Here FreePartition goes beyond Windows Disk Management, which can shrink and extend partitions but cannot move, merge or split them. Every change below is queued first and only runs after you press Apply (more on that in section 7).
Every operation also lives in the right-click menu, which mirrors the Operations panel. Items that do not apply to the selected partition are greyed out.
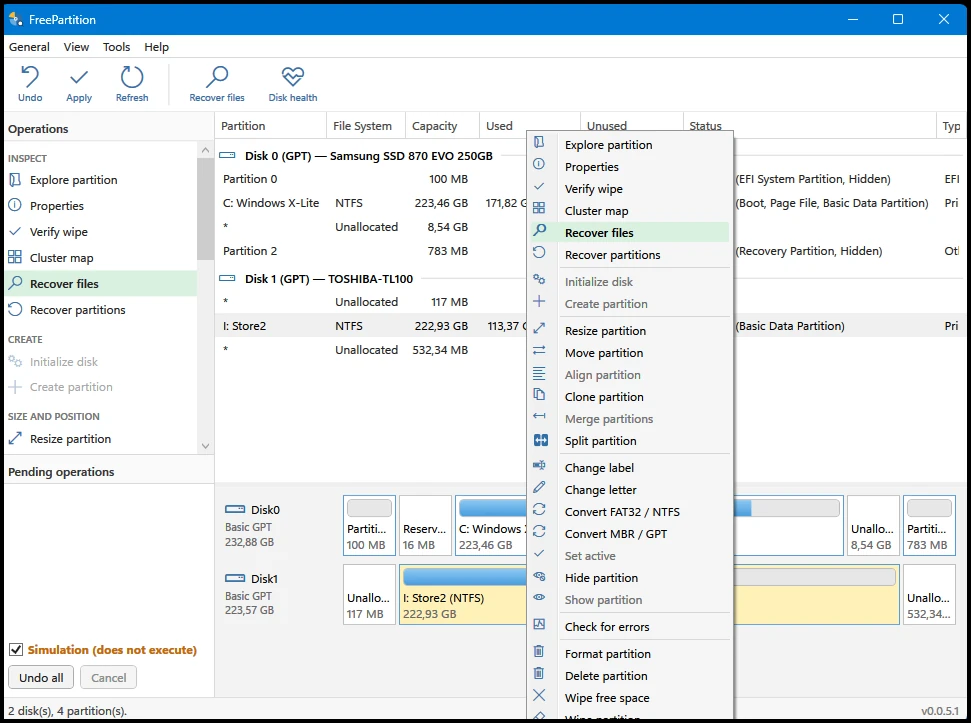
Resize
Select a partition, choose Resize partition and drag the handle, or type an exact size. If there is free space next to the partition, you can extend it. If it has unused room inside, you can shrink it.
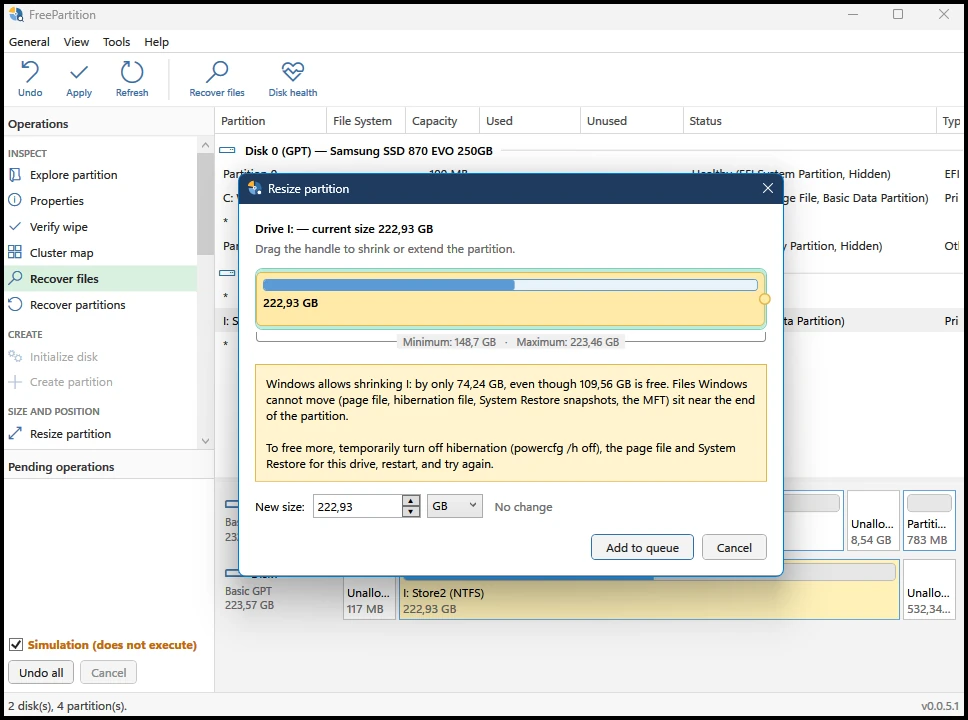
The dialog is smart about Windows’ own limits. In the example below, drive I: has 109.56 GB free but can only shrink by 74.24 GB, because files Windows cannot move, such as the page file, the hibernation file, System Restore snapshots and the NTFS index (the MFT), sit near the end of the partition. The app suggests temporarily turning off hibernation with powercfg /h off, plus the page file and System Restore for that drive, then restarting and trying again. Switch hibernation back on afterwards with powercfg /h on.
Split
Got one huge C: drive and want a separate space for files? Split partition uses the free space inside a partition and carves it into two. You choose the size, file system (NTFS, FAT32 or exFAT), label and drive letter for the new one. Your existing files stay on the original partition.
Merge
Merge partitions folds the selected partition into the one right before it. Its files are kept inside a folder on the merged drive.
Move and align
Move partition shifts a partition into free space on the same disk. Align partition nudges one that is not on a 4 KB boundary to the nearest 1 MB boundary, which is better for modern drives. Both come with a serious caution.
Convert and clean up
The app can convert between FAT32 and NTFS while keeping your files, and between MBR and GPT (two ways of storing a disk’s partition table) without wiping the disk. The MBR and GPT converter refuses the disk Windows boots from. For that disk, use Microsoft’s own mbr2gpt.exe instead. A built-in check for errors runs chkdsk for you.
The Windows drive gets extra protection: format, change letter, move, clone and wipe are all blocked on it. Move and align also need the partition to have a drive letter, so hidden partitions such as Windows’ recovery partition may not qualify.
Bringing back a lost partition
If a partition vanishes from the list, because it was deleted by mistake, its table got corrupted or the disk suddenly shows as uninitialised, the Recover partitions operation can look for it. It searches only the unallocated space of the selected disk and does not change anything while scanning.
- Choose the disk and start Recover partitions. Pick Quick (looks where partitions usually begin) or Deep (reads every sector of the free space, so it takes as long as copying that space).
- Review the results. A partition whose backup boot sector also matches is marked high confidence and ticked by default. One that matches only the first boot sector is low confidence and left unticked.
- Add to queue, then Apply. The app writes only the partition table entry. It does not format anything, so the files come back as they were.
It finds NTFS, FAT32 and exFAT partitions only. FAT12 and FAT16, ReFS and Linux file systems are not detected, according to the project’s documentation. A restored partition also gets a new GPT identifier and a basic data type. If the data is irreplaceable, consider working from a copy of the drive or asking a professional first.
The safety net: simulation and the queue
Partition tools are risky because one wrong click can erase a drive. FreePartition’s answer is to slow everything down. Nothing that changes a disk runs immediately.
The workflow in four steps. The green steps cannot damage your data.
- Simulation first. Until you untick the checkbox, the app just shows what it would do.
- A confirmation that names the risk. Before Apply runs, you see a warning that lists what could go wrong.
- Undo until Apply. You can remove queued actions at any point before you apply them.
- Read-only scans. Recovery scans never write to the drive you are searching, and the destination must be a different drive.
- A log. Every action is recorded in
operations.loginside%LocalAppData%\FreePartition. - Stop at the first failure. If one queued action fails, the rest stay pending instead of running blindly.
None of this replaces a backup. It simply makes accidents less likely, and it is the thing that makes a young project reasonable to try.
How it compares with other tools
FreePartition does not exist in a vacuum, and some of its rivals have decades of testing behind them. Here is how it lines up against two free options you may already have heard of.
| Feature | Windows Disk Management | FreePartition 0.1.0 | TestDisk + PhotoRec |
|---|---|---|---|
| Price | Built into Windows | Free, MIT licence | Free, open source |
| Create, format, delete | Yes | Yes | No |
| Shrink and extend | Yes (extend needs free space right after the partition) | Yes | No |
| Move, merge, split | No | Yes | No |
| Undelete files | No | Yes | Yes |
| Find lost partitions | No | Yes | Yes |
| Drive health (S.M.A.R.T.) | No | Yes, read-only | No |
| Interface | Graphical | Graphical, needs admin rights | Mostly text-based |
| Track record | Decades | New: version 0.1.0 | Decades |
A few other names come up often, so here is where each one fits:
- Windows File Recovery. Microsoft’s own command-line recovery tool, available from the Microsoft Store. Solid, but you have to be comfortable typing commands.
- GParted. A respected open-source partition editor. You run it from a bootable USB stick rather than inside Windows.
- EaseUS and MiniTool. Polished suites with free editions. Some features are reserved for paid plans, which is the exact gap FreePartition is trying to fill.
FreePartition’s real selling point is convenience: one free, graphical app instead of several separate tools. What it lacks is a long history. Where that matters, such as a one-off recovery of irreplaceable files, an older tool is the more conservative choice.
Limits, and who should wait
The developer is upfront about what the app cannot do yet, and it helps to know before you start.
- It is a new project. Version 0.1.0 is the first stable release, from what looks like a one-developer effort. Expect rough edges and a small community.
- Names need NTFS. On FAT and exFAT, recovery is carving only, so files come back without names, folders or dates.
- Some files are out of reach. Compressed or encrypted (EFS) files on NTFS show as “Unavailable”, and fragmented files can come back damaged.
- SSDs with TRIM usually have deleted data already discarded.
- Narrow lost-partition support. Only NTFS, FAT32 and exFAT are found.
- Dynamic disks. The MBR and GPT converter refuses them.
If your files are truly irreplaceable, or the machine is a server or part of a RAID setup, a recovery professional or a long-established tool is the safer call. For everyday jobs on a home PC, FreePartition is worth testing, and the best way to test it is on a disk you do not care about.
Practise on a throwaway virtual disk
Windows can create a virtual hard disk (a VHD) that behaves like a real one but lives in a single file. It is a perfect sandbox.
- Open Disk Management, choose Action, then Create VHD.
- Set the size to 2 GB, choose Dynamically expanding and save the file somewhere you can easily find.
- Right-click the new disk, choose Initialize Disk (GPT is fine), then create a New Simple Volume formatted as NTFS.
- Copy a few files onto it, delete them, then scan that volume in FreePartition.
- When you are done, right-click the disk in Disk Management, choose Detach VHD, then delete the file.
Common mistakes to avoid
- Carrying on as normal after a deletion. Browsing, installing or saving files can overwrite what you want back. Stop using the drive first.
- Skipping the backup. Even with a queue and a confirmation, resizing, moving and converting are never zero-risk.
- Unticking Simulation too early. Queue your actions, review them, and only then switch simulation off.
- Moving a partition on battery power. A power cut mid-move corrupts the partition, so use the charger or a UPS.
- Downloading from a lookalike page. Use the project’s GitHub Releases page and check the SHA256 value.
- Expecting file names back from an SD card. Carved files come back as numbered names, so keep the thumbnail gallery handy.
- Trying a risky operation on your only drive. Rehearse on a virtual disk first.
💬 Comments