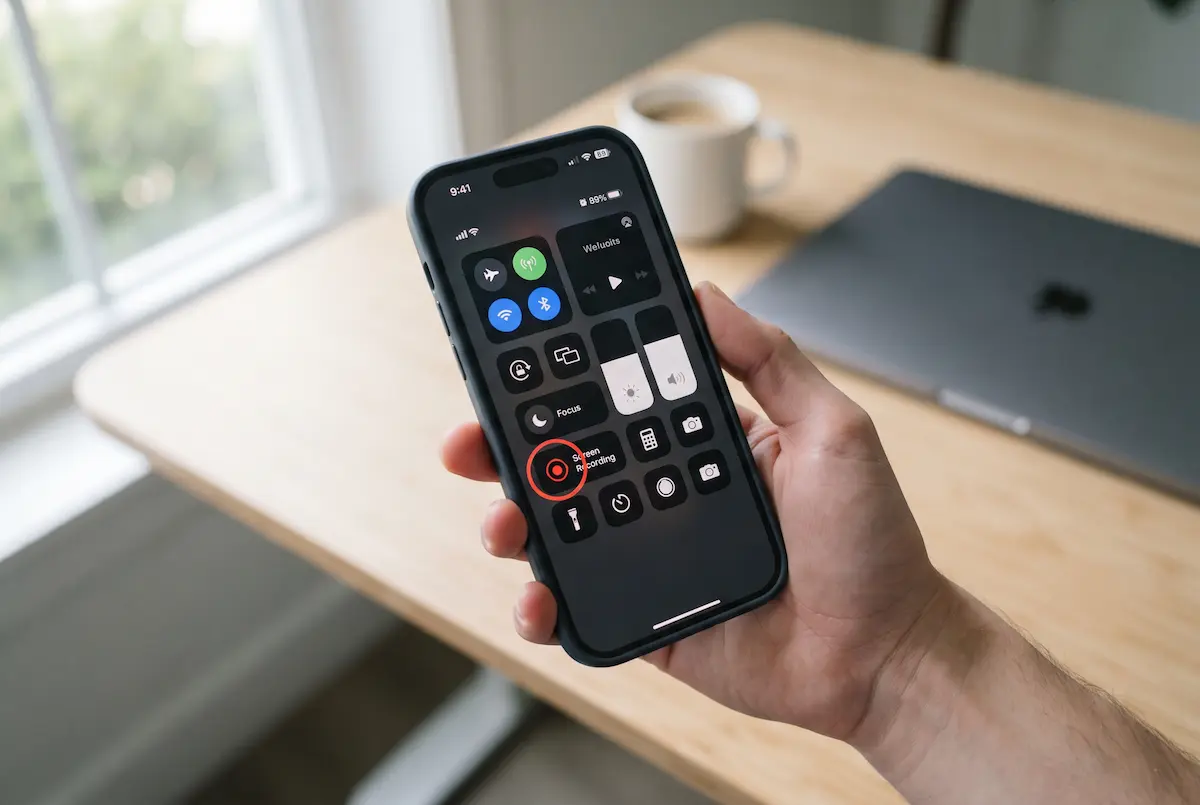
Screen recording is built into every iPhone, so you don’t need to install anything. It takes about three taps, and it can capture the sound from the phone and your own voice too.
The part that trips people up is everything around it: where the button hides, how to switch the microphone on, where the video ends up, and why some apps record as a black screen. This guide covers all of that for iOS 26 and iOS 27, in plain language.
1. The quick answer
Here is the fastest route. Each step is explained in more detail below.
- Add the Screen Recording button to Control Center (one time only).
- Swipe down from the top-right corner of the screen to open Control Center.
- Tap the Record button and wait for the three-second countdown.
- Close Control Center and do whatever you want to capture.
- Tap the red indicator at the top of the screen, then tap Stop.
The video is saved in your Photos app. If you want your voice in the video, hold the Record button and turn on the microphone before you start.
2. Step 1: Add Screen Recording to Control Center
On many iPhones the Record button is already in Control Center. If you can’t see it, it just needs to be added once.
The Settings way
- Open Settings and tap Control Center.
- Scroll to More Controls and find Screen Recording.
- Tap the green + next to it.
The quicker way
You can also do it from Control Center itself. Open it, touch and hold an empty spot (or tap the + at the top left), choose Add a Control, and search for “Screen Recording”. Tap it and it’s added.
While you’re there, you can drag the button to a spot that is easy to reach with your thumb.
3. Step 2: Start and stop a recording
Start
Swipe down from the top-right corner to open Control Center, then tap the Record button. It looks like a circle inside a circle. You’ll see a three-second countdown, which gives you time to close Control Center and get to the screen you want.
Stop
There are two easy ways to stop. Tap the red indicator at the top of the screen and confirm with Stop, or open Control Center again and tap the red Record button.
See the whole process step by step
This short animation shows every step in order, including the microphone and the saved video. Tap any step to jump to it.
Three small things that make a big difference
- Turn on a Focus first. Notifications appear in the video. A Do Not Disturb or similar Focus keeps messages from popping up in the middle of your clip.
- Rotate the phone before you start. If you want a landscape video of a game or an app, turn the iPhone sideways first, then press Record.
- Plug in for long recordings. Recording uses battery and storage, so a charger helps if you plan to record for a while.
4. How to record with sound or your voice
There are two kinds of audio, and it helps to know the difference:
- Sound from the iPhone (music, game sounds, a video playing) is recorded by default.
- Your voice through the microphone is off by default. You have to switch it on yourself.
Record with the microphone
- Open Control Center.
- Touch and hold the Record button (don’t just tap it).
- Tap Microphone so it turns red.
- Tap Start Recording and wait for the countdown.
Check the microphone icon every time. A silent voice-over is the most common reason people redo a recording, and you only find out at the end.
Tips for clean audio
- Record in a quiet room and hold the iPhone about a hand’s width from your mouth.
- If the app also plays sound, use headphones. Otherwise the microphone picks up the speaker and you get an echo.
- AirPods or a wired headset usually sound better than the built-in microphone.
- Want only your voice and no app sound? Lower the app’s volume before you start.
5. Where your screen recordings are saved
Every recording goes to the Photos app. Open it, stay on Library, and scroll to the very end. The newest item is your recording, with its length shown in the corner.
To see only your recordings, look for Media Types in Photos and tap Screen Recordings. It is a handy shortcut when your library has thousands of items.
If you use iCloud Photos, the video is also uploaded to iCloud and shows up on your other Apple devices. A long recording can take a while to upload, and it counts toward your iCloud storage.
Deleted something by mistake? Open Recently Deleted in Photos. Videos stay there for a limited time before they are removed for good.
6. Trim, edit and share the video
You almost never need an extra app to clean up a recording, because the Photos app can do the basics.
- Open the recording in Photos and tap Edit.
- Drag the handles at the start and end of the timeline to cut off the parts you don’t need. The first seconds, where you reach for the stop button, are usually the first to go.
- Tap Done, then choose Save Video to replace the original or Save Video as New Clip to keep both.
To share it, tap the Share button. AirDrop is the quickest way to send it to a Mac or another iPhone. Messaging apps work too, but they often compress the video and the text on screen can look blurry.
Recordings can get large, especially long ones. If you send a lot of them, trim first. It makes the file smaller and the video easier to follow.
7. Why recording fails, goes black or has no sound
Most problems come down to a handful of causes. This table covers the common ones:
| Problem | Likely cause | What to do |
|---|---|---|
| No Record button | It was never added, or it was removed | Add it in Settings → Control Center |
| Recording won’t start | Screen mirroring is on, or recording is restricted | Stop mirroring and check Screen Time restrictions |
| Black video area | The app blocks recording (copy protection) | Nothing to fix. The app does not allow it |
| No voice in the video | Microphone was off | Hold the Record button and turn Microphone on |
| No sound at all | The app blocks audio, or its volume was down | Raise the app volume and test again |
| Video is tiny with black bars | You rotated the phone after pressing Record | Rotate first, then start recording |
Streaming apps record as black
Netflix, Disney+ and similar apps protect their videos with copy protection (DRM, short for digital rights management). When you record, the video area comes out black. This is on purpose, and there is no setting that changes it. Use the app’s own download feature for offline watching instead.
Some apps block audio or video
Apple notes that some apps may not allow you to record audio or video. Banking apps and phone-call audio are typical examples. If one app records badly but everything else works, the app is almost certainly the reason.
Screen Time can switch recording off
On a family or work iPhone, recording can be restricted. Check Settings → Screen Time → Content & Privacy Restrictions → Content Restrictions and make sure Screen Recording is set to Allow. If it is greyed out or protected by a passcode, ask the person who manages the device.
Mirroring and recording don’t mix
You can’t record your screen and use screen mirroring at the same time. Stop mirroring to an Apple TV or a TV first, then start the recording.
Not enough space
If the iPhone is nearly full, a recording may fail or won’t save properly. Free up some space in Settings → General → iPhone Storage before a long session.
8. Another way: record your iPhone on a Mac
If you want to edit the video on a computer, or you need a bigger and steadier capture, you can record the iPhone through a Mac with a cable.
- Connect the iPhone to your Mac with a cable and unlock it. Tap Trust if asked.
- Open QuickTime Player on the Mac.
- Choose File → New Movie Recording.
- Click the small arrow next to the red Record button and pick your iPhone as the camera.
- Click Record, use the iPhone as usual, then click Stop on the Mac.
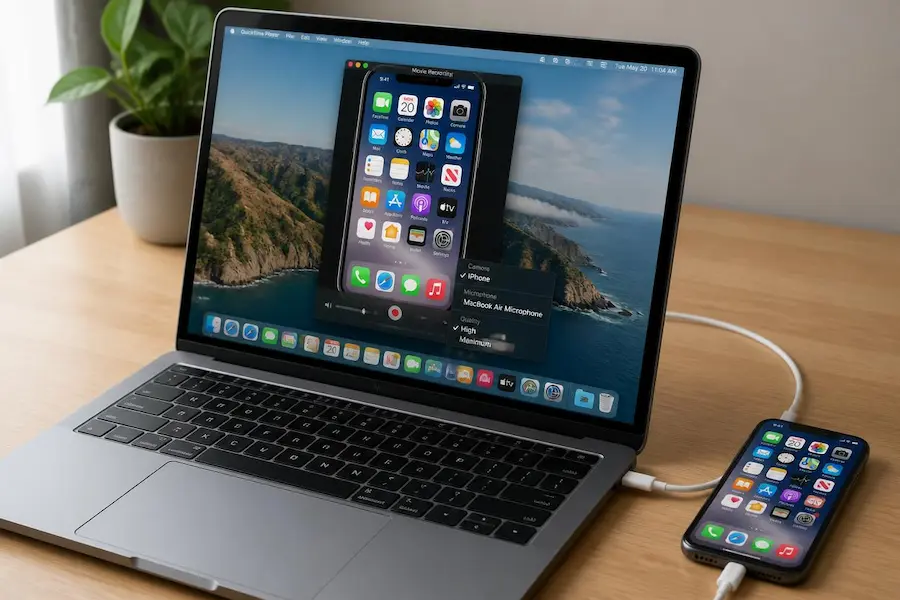
This method also works well when you need to record something that is hard to do with a finger on screen, because you can watch it on the larger Mac display. For quick everyday clips, though, the built-in Control Center button is simpler.
9. Quick tips and common mistakes
A few habits make screen recordings look cleaner and save you from doing them twice.
Before you press Record
- Check the microphone icon. A recording with no voice is the most common mistake, and you only notice at the end.
- Turn on a Focus. This stops notification banners from covering what you are showing.
- Rotate the phone first if you need a landscape video.
- Close apps you don’t need and hide anything private, like messages or email previews.
While you record
- Move slowly. Quick swipes and fast taps are hard to follow on video.
- Pause for a second on each new screen so viewers can read it.
- Keep sessions short. Several small clips are easier to edit and share than one very long video.
After you stop
- Trim the start and the end, where the Control Center and the stop button appear.
- Delete test recordings right away. Videos take more space than most people expect, and they also stay in Recently Deleted for a while.
- Before you share a video, watch it once to make sure no private details appear on screen.
10. FAQ
Does iPhone screen recording capture sound?
Yes. It records the sound playing on the iPhone by default, such as music, game audio or a video. Your own voice is only recorded if you hold the Record button in Control Center and turn Microphone on before you start.
How long can I screen record on iPhone?
iOS does not set a fixed time limit. In practice the limit is your free storage and battery, so for long recordings keep the iPhone plugged in and check that you have enough space first.
Why is my iPhone screen recording black?
The app is probably protecting its content. Streaming apps such as Netflix and Disney+ use copy protection, so the video area records as black even though the rest of the screen is captured. Some banking and other sensitive apps do the same.
Where do screen recordings go on my iPhone?
They are saved in the Photos app. Open Photos and scroll to the end of your Library, or look under Media Types and tap Screen Recordings to see only those videos.
Can I screen record while using screen mirroring?
No. Apple says you cannot record your screen and use screen mirroring at the same time. Stop mirroring first, then start the recording.
Does the other person know when I screen record?
iOS itself does not send any notification. Some apps, however, can detect it and alert the other person, and recording other people without their permission can be a legal problem, so ask first.
💬 Comments