Taking a screenshot on a Mac is easy once you know the shortcuts, but there are more ways to do it than most people realize. You can grab the whole screen, a single window, or just a small rectangle, and you can send the result straight to the clipboard instead of filling your Desktop with files.
This guide covers every method in 2026, from the three classic shortcuts to the full Screenshot toolbar, with short steps, handy tricks, and fixes for when something doesn't work. The shortcuts have stayed the same since macOS Mojave, so everything here applies to any modern Mac.
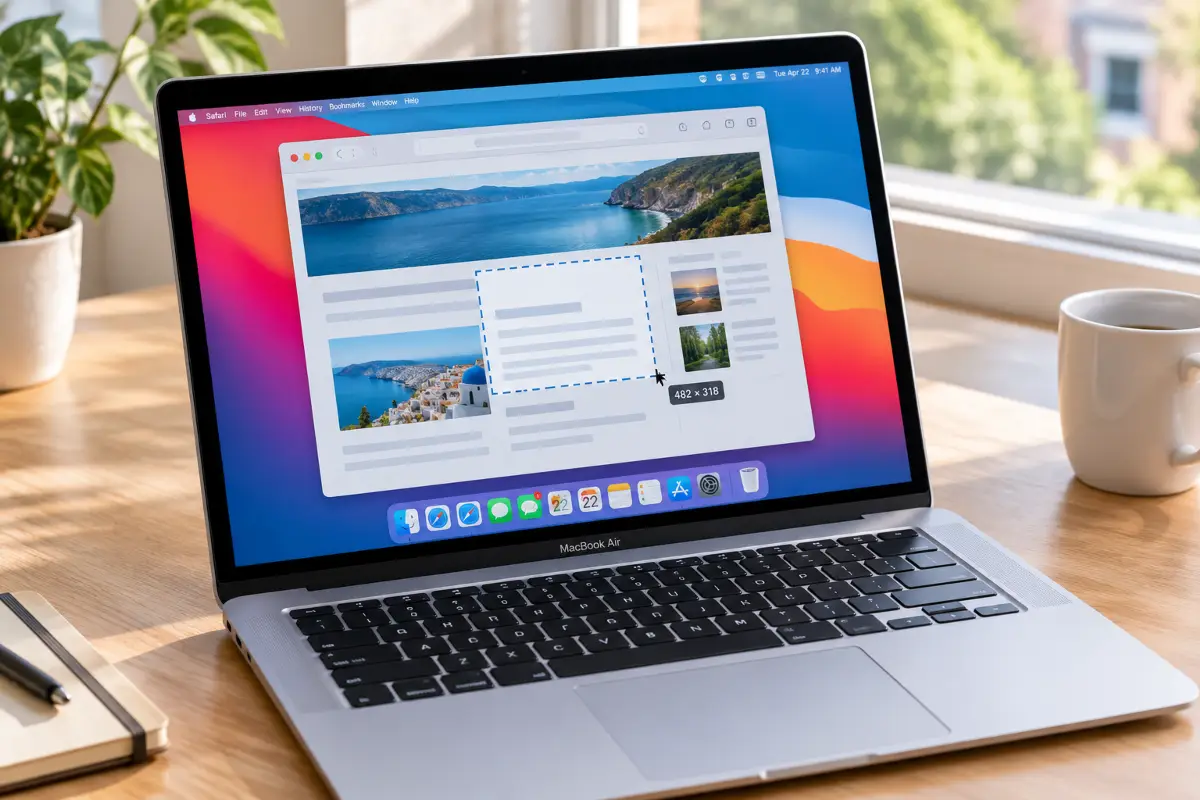
The quick answer: Mac screenshot shortcuts
If you just need the shortcut, here is the short version. Every Mac screenshot shortcut uses the same three keys as a base: Shift, Command (the key with the ⌘ symbol), and a number.
| Shortcut | What it does |
|---|---|
| Shift + Command + 3 | Captures the entire screen |
| Shift + Command + 4 | Captures a selected area that you drag out |
| Shift + Command + 4, then Space | Captures a single window or menu |
| Shift + Command + 5 | Opens the Screenshot toolbar with every option, including screen recording |
| Add Control to 3 or 4 | Copies the screenshot to the clipboard instead of saving a file |
By default, screenshots are saved to your Desktop as PNG files, and a small thumbnail appears in the bottom-right corner of the screen for a few seconds. The rest of this guide explains each method in detail, including a few tricks that make them much more useful.
Screenshot the whole screen
This is the simplest method, and it's perfect when you want to show exactly what's on your display.
Get your screen the way you want it: close anything private and open the app or page you want to show.
Press Shift + Command + 3 at the same time.
Look for the thumbnail in the bottom-right corner. In a few seconds it disappears and the file is saved to your Desktop.
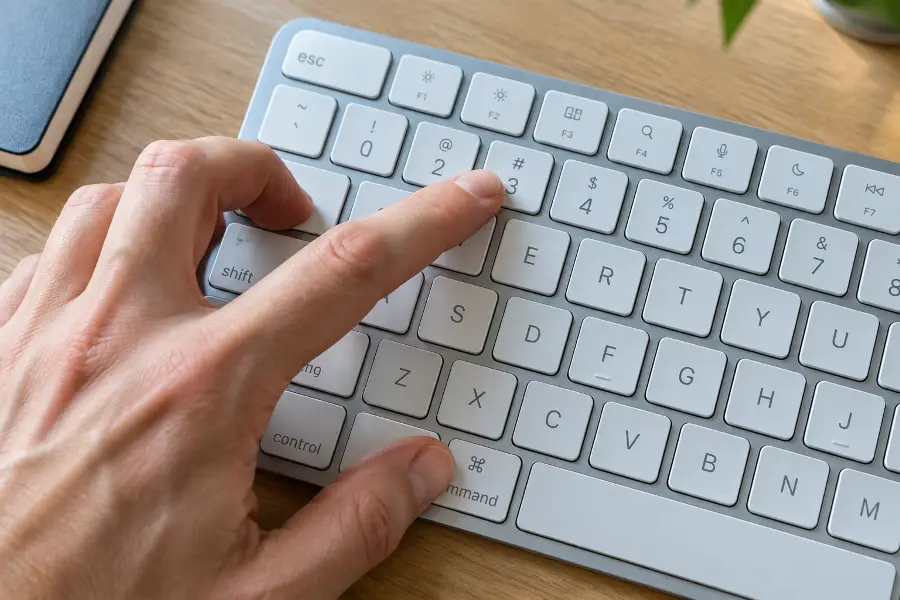
If you use more than one display, your Mac saves a separate screenshot for each screen. Also, the file name includes the date and time, so you'll see something like Screenshot 2026-09-30 at 10.15.20.png, which makes it easy to sort them later.
Screenshot a selected area
Most of the time you don't need the whole screen, just one part of it. This is the shortcut you'll probably use most.
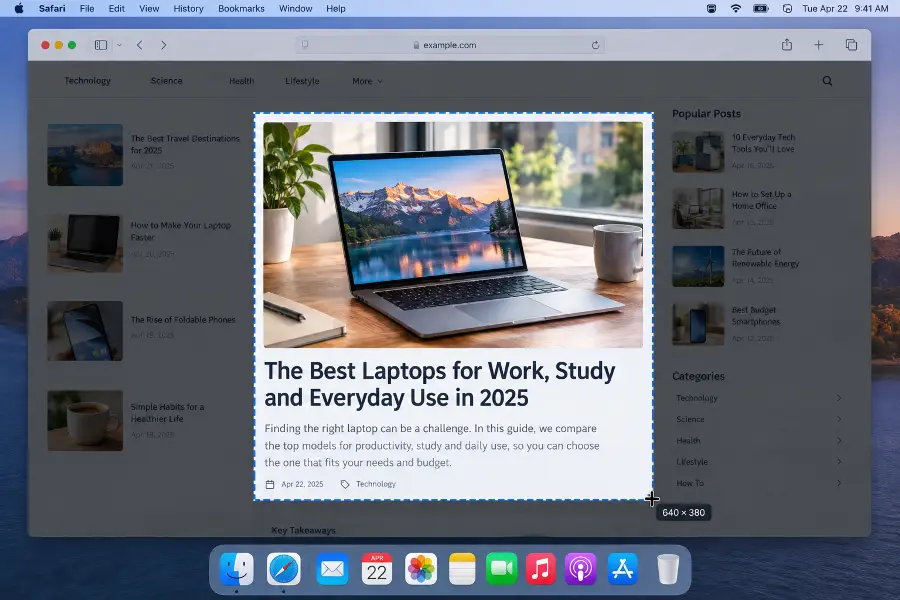
Press Shift + Command + 4. Your pointer turns into a crosshair with numbers next to it.
Click and drag to draw a rectangle around the area you want.
Release the mouse button or trackpad to take the screenshot. To cancel instead, press Esc before you let go.
Tricks while you're dragging
Once you have started dragging, a few extra keys give you much more control over the selection:
| Hold this | What happens |
|---|---|
| Space | Moves the whole selection without changing its size, useful when your box is the right size but in the wrong spot |
| Shift | Locks one direction, so you can adjust only the width or only the height |
| Option | Resizes the selection from its center instead of from a corner |
The pixel numbers next to the crosshair are also handy if you need a screenshot of an exact size, for example for a blog post or a presentation slide.
Screenshot a single window or menu
Instead of dragging a box around a window, you can let your Mac capture it perfectly with one click. The result is clean, with rounded corners and a soft shadow around the window.
Press Shift + Command + 4.
Press the Space bar. The crosshair changes into a small camera icon.
Move the camera over a window. It's highlighted in blue, so you know exactly what will be captured.
Click the window to take the screenshot.
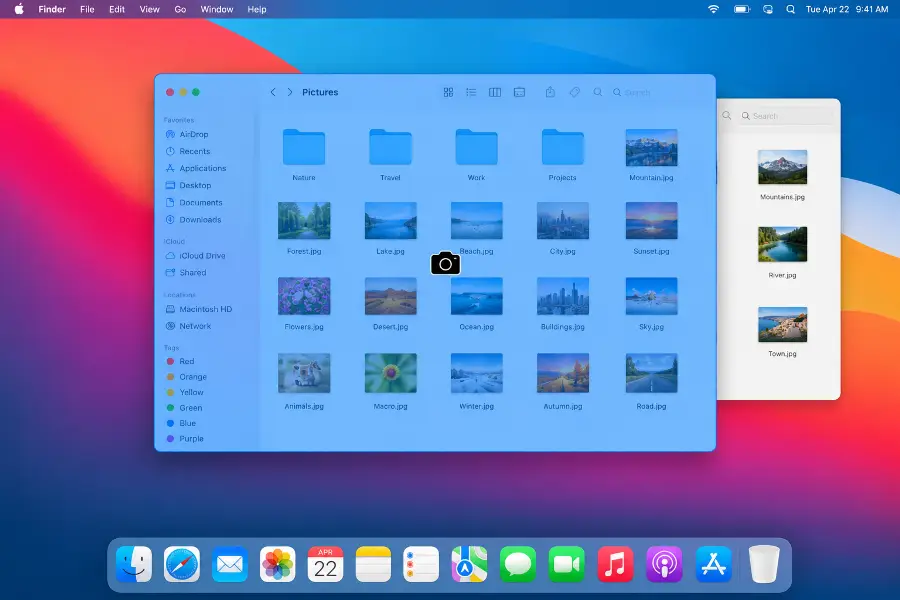
Tip: To remove the shadow around the window, hold down Option when you click. This gives you a tidier image that's easier to place in a document or an article.
The same trick works on other parts of the screen too. You can capture the Dock, the menu bar, or an open menu. For menus that close as soon as you press a key, use the timer in the Screenshot toolbar, explained in the next section.
The Screenshot toolbar and its options
If you can only remember one shortcut, make it Shift + Command + 5. It opens a small toolbar at the bottom of the screen that puts every option in one place, so you don't need to remember the other shortcuts at all.
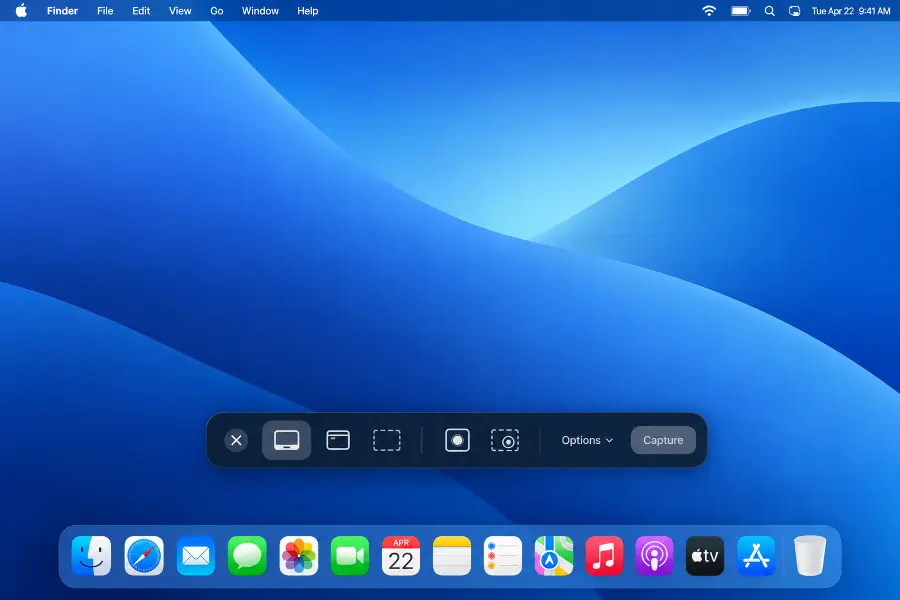
From left to right, the toolbar lets you capture the entire screen, capture a selected window, capture a selected portion, record the entire screen, or record a selected portion. Choose a mode, adjust the selection if needed, and click Capture.
What you'll find under Options
The Options menu is where the toolbar really becomes useful:
| Option | What it does |
|---|---|
| Save to | Choose Desktop, Documents, Clipboard, Mail, Messages, Preview, or another folder |
| Timer | Adds a delay of 5 or 10 seconds before the screenshot is taken |
| Show Floating Thumbnail | Turns the small preview in the corner on or off |
| Remember Last Selection | Reopens the same capture area next time, great for repeated shots |
| Show Mouse Pointer | Includes the pointer in the screenshot |
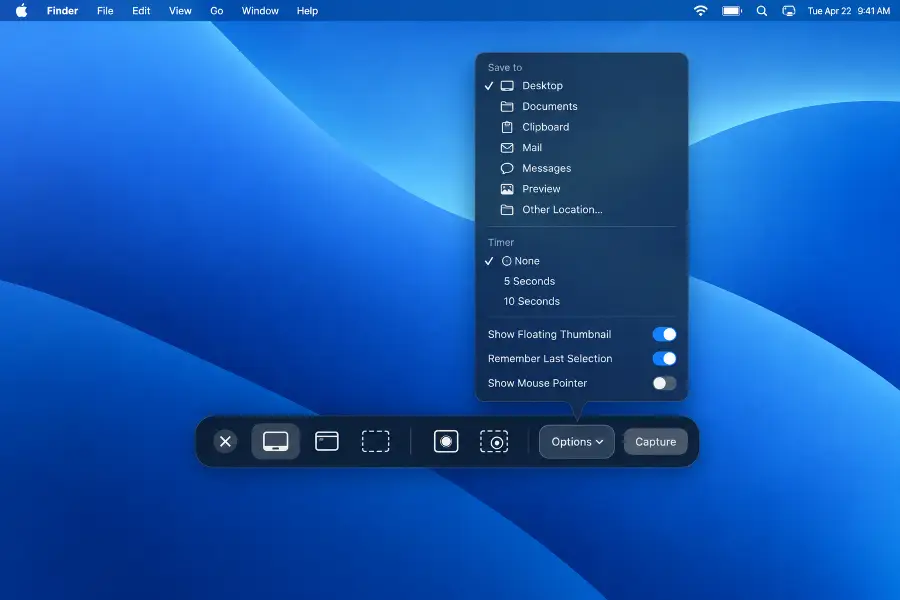
The timer is the answer to a common problem: capturing something that disappears when you press a key, such as a pop-up menu or a tooltip. Set the timer to 5 seconds, click Capture, open the menu, and wait.
Copy a screenshot to the clipboard
Not every screenshot needs to become a file. If you only want to paste the image into an email, a chat, or a document, saving it first is just extra work, and it leaves clutter behind.
Add the Control key to either shortcut:
| Shortcut | Result |
|---|---|
| Control + Shift + Command + 3 | Copies the whole screen |
| Control + Shift + Command + 4 | Copies the area you select (add Space for a window) |
Then go to where you want the image and press Command + V. It works in Mail, Messages, Notes, Pages, Slack, and most web-based editors.
If your Mac and iPhone are signed in with the same Apple Account, Universal Clipboard lets you copy on your Mac and paste on your iPhone, or the other way around, as long as they are close to each other.
Edit and mark up a screenshot
The thumbnail that appears in the corner isn't just a preview. It's a shortcut to a built-in editor, and it's often all you need to finish the job.
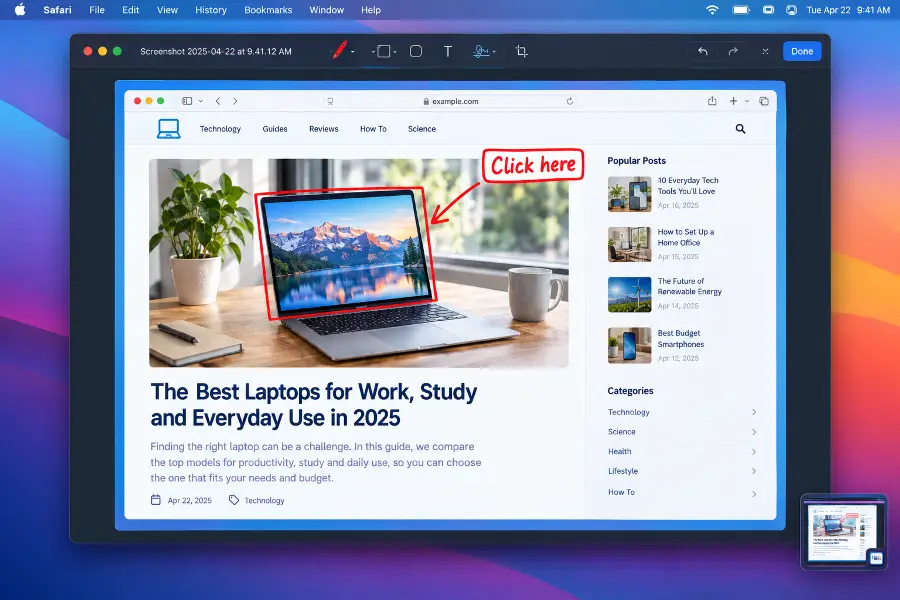
Here is what you can do with it:
Click the thumbnail to open the Markup editor. You can crop, draw, add arrows and shapes, type text, and even add a signature.
Swipe it to the right to dismiss it. The screenshot is saved straight away, without waiting for the timer to run out.
Control-click it (or right-click) for a menu where you can change where it's saved, open it in another app, show it in Finder, or delete it.
When you finish editing in Markup, click Done and the edited version is saved. You can also open any saved screenshot in Finder, press Space for Quick Look, and use the Markup button there.
Change where screenshots are saved
Sooner or later, your Desktop fills up with files named Screenshot. The fix takes less than a minute.
Press Shift + Command + 5.
Click Options.
Under Save to, pick a folder, or choose Other Location to create or select your own.
From then on, every screenshot goes to that folder, including the ones you take with the classic shortcuts.
Switch from PNG to JPG (optional)
Screenshots are saved as PNG by default, which gives sharp text but can create large files. If you prefer smaller JPG files, you can change the format in Terminal. Open Terminal from Applications > Utilities, and run these two lines one after the other:
defaults write com.apple.screencapture type jpg
killall SystemUIServer
To go back to PNG, run the same commands again with png in place of jpg.
Note: Terminal does exactly what you type, so copy the lines carefully. These two commands only change the screenshot format and nothing else on your Mac.
Other ways to capture your screen
The keyboard shortcuts cover almost everything, but a few other options are worth knowing.
The Screenshot app and Preview
The Screenshot toolbar is also a real app. Open Spotlight with Command + Space, type Screenshot, and press Return. If you prefer menus over shortcuts, Preview offers a similar set: open Preview and choose File > Take Screenshot, then pick From Selection, From Window, or From Entire Screen.
A Windows keyboard on your Mac
If you use a Windows keyboard, the Windows key works as Command and Alt works as Option. So Shift + Win + 3 or 4 gives you the same results.
Screenshots of the Touch Bar
On older MacBook Pro models with a Touch Bar, Shift + Command + 6 captures the Touch Bar itself. Newer Macs don't have one, so this shortcut is only for those older models.
Long web pages
macOS doesn't have a built-in scrolling screenshot. For a long web page, the closest option is File > Print, then PDF > Save as PDF, which saves the whole page in one file. Otherwise, take several screenshots as you scroll, or use a third-party app made for the job.
Recording the screen instead
Sometimes a video says more than a picture. The same Shift + Command + 5 toolbar can record your whole screen or a selected part. To stop recording, click the stop button in the menu bar, or press Command + Control + Esc.
When Mac screenshots don't work
If you press the shortcut and nothing happens, or you can't find the file afterward, check these things in order.
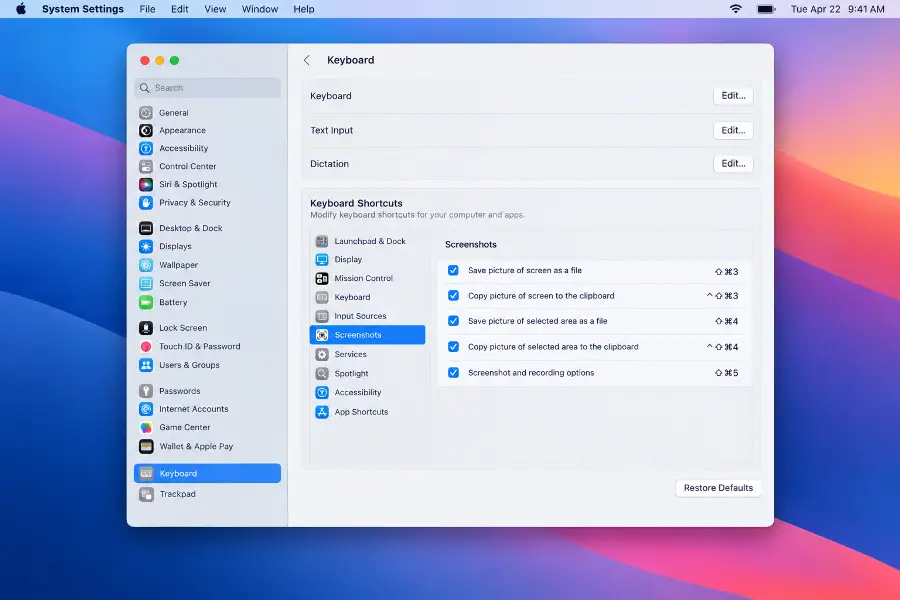
1. Make sure the shortcuts are turned on
Open System Settings > Keyboard > Keyboard Shortcuts and select Screenshots in the sidebar. Every shortcut in the list should be ticked. If they look wrong, click Restore Defaults.
2. Check the save location
If you changed the folder earlier, your screenshots may simply be somewhere else. Press Shift + Command + 5, click Options, and look under Save to. Also make sure your disk isn't full, because a Mac with no free space can't save new files.
3. Look for apps that use the same shortcuts
Some screenshot tools, cloud storage apps, and screen recorders take over the same key combinations. If your shortcuts stopped working after installing something new, check that app's settings and change or disable its screenshot shortcut.
4. A black window in the screenshot
Videos from some streaming services are protected, so a screenshot of the video area can come out black. This is a restriction from the app or the service, not a fault with your Mac.
If nothing helps, restart your Mac and try again. It sounds too simple, but it fixes a surprising number of odd keyboard problems.
My experience
I went through every method in this guide on a MacBook Air with Apple silicon running macOS Tahoe, and then repeated the main shortcuts with an external keyboard to make sure they behave the same way.
Three things made the biggest difference in day-to-day use. First, the Space trick after Shift + Command + 4 is much faster than dragging a box around a window, and it never cuts off a corner. Second, the Option-click to remove the shadow gives cleaner images for articles. Third, the 5-second timer in the toolbar was the only reliable way to capture a pop-up menu that closed the moment I touched the keyboard.
What went wrong at first: after a day of taking screenshots for a tutorial, my Desktop was full of files and I lost time looking for the right one. Moving the save location to a dedicated folder through Options > Save to fixed that for good. I also got a completely black rectangle when I tried to capture a protected video, so I now capture the player controls and the rest of the page instead.
For quick one-off images that I just paste into a message, I use the Control version of the shortcuts, since nothing needs to be saved or deleted afterward.
Frequently asked questions
Where do screenshots go on a Mac?
By default, screenshots are saved to your Desktop with a name that starts with Screenshot followed by the date and time. You can pick a different folder in the Screenshot toolbar: press Shift + Command + 5, click Options, and choose a location under Save to.
How do I take a screenshot on a Mac without saving a file?
Hold the Control key together with the normal shortcut. Control + Shift + Command + 3 copies the whole screen, and Control + Shift + Command + 4 copies a selected area. Then paste it anywhere with Command + V.
How do I screenshot a single window without the shadow?
Press Shift + Command + 4, then press the Space bar so the pointer turns into a camera. Hold down the Option key and click the window. The screenshot will be saved without the drop shadow.
Can I take a scrolling screenshot on a Mac?
macOS does not have a built-in scrolling screenshot. For a long web page, you can use File, then Print, and save the page as a PDF. Otherwise, take several screenshots as you scroll, or use a third-party app designed for scrolling captures.
Why are my Mac screenshot shortcuts not working?
Open System Settings, go to Keyboard, then Keyboard Shortcuts, and select Screenshots. Make sure the shortcuts are ticked, or click Restore Defaults. Also check that another app has not taken over the same shortcuts, and that your screenshots are not being saved to a different folder.
How do I change Mac screenshots from PNG to JPG?
Open Terminal and run defaults write com.apple.screencapture type jpg, then run killall SystemUIServer. New screenshots will be saved as JPG files. To go back, run the first command again with png instead of jpg.
💬 Comments