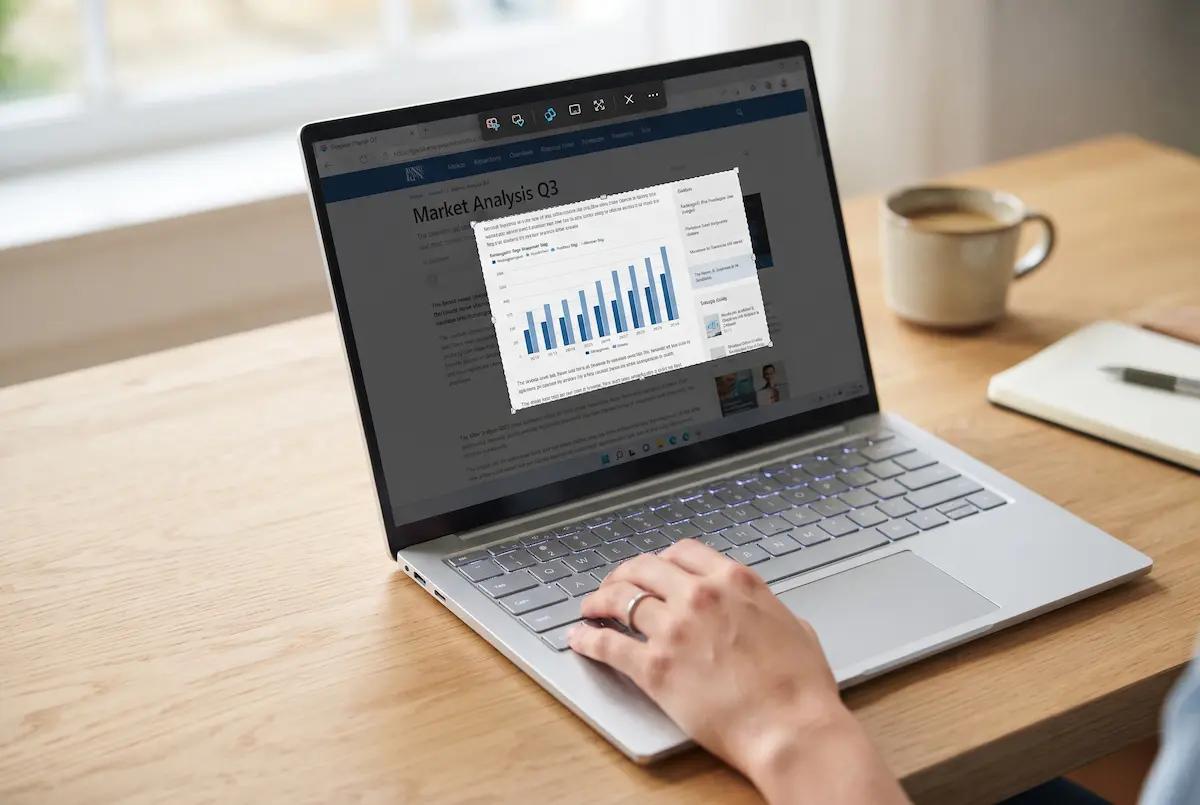
You need to grab something off your screen: an error message for tech support, a receipt, a funny chat, a setting you want to remember. Windows 11 gives you more ways to do it than most people realize, and each one suits a different job.
Here's the short version. Press Win + Shift + S, drag across what you want, and paste it wherever you like. If you only learn one method, make it that one. The rest of this guide covers every other option, where your files end up, and what to do when a screenshot refuses to cooperate.
1. Win + Shift + S: the shortcut worth memorizing
This is the modern, flexible way to take a screenshot on Windows 11, and it's the one I'd teach a friend first. Hold the Windows key, then Shift, then tap S. Your screen dims, and a small toolbar appears at the top.
Mockup: the Win + Shift + S overlay with the toolbar at the top and a selection being dragged.
The toolbar has four capture modes. Pick one, then click or drag:
On recent updates the same bar also has a switch for screen recording, which I cover in a later section.
What happens after you capture
The image is copied to your clipboard straight away, so you can paste it into an email, a chat, Word or Paint with Ctrl + V. A small notification also pops up in the corner. Click it and the screenshot opens in the Snipping Tool, where you can crop, draw on it or save it.
On current versions, Snipping Tool also keeps a copy in your Pictures folder, so a screenshot isn't lost if you forget to paste it. There's a setting for that inside the app, which I'll point out below.
Turn on clipboard history with Win + V and Windows remembers your last several copied items. Take three screenshots in a row and you can still paste any of them later.
2. The Print Screen key and its variations
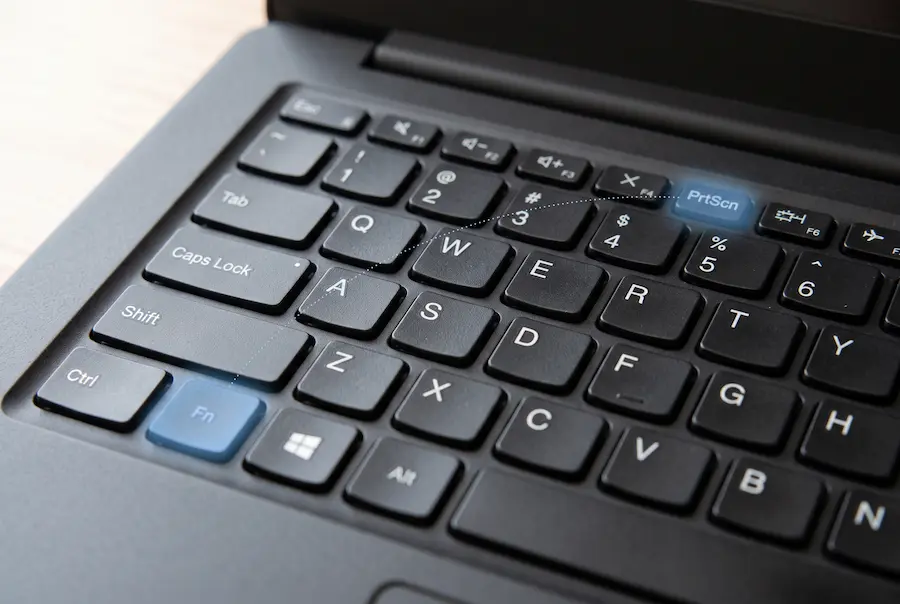
The Print Screen key has been around for decades, and it still works. The label differs by keyboard: PrtSc, PrtScn, PrtScr or Prt Sc. It usually sits to the right of the function keys. What it does depends on what you press with it.
| Shortcut | What it captures | What happens |
|---|---|---|
| PrtSc | The whole screen | Copies it to the clipboard (or opens the snipping bar, see below) |
| Win + PrtSc | The whole screen | Saves a PNG file straight to Pictures > Screenshots |
| Alt + PrtSc | The active window only | Copies it to the clipboard |
Win + PrtSc: a file with no extra steps
This one is great when you don't want to paste anything. The screen flickers or dims for a moment, and a file appears in your Screenshots folder. Nothing opens and nothing needs saving. It's perfect for quickly documenting what's on screen while you work.
Alt + PrtSc: just one window
Click the window you want first, then press Alt + PrtSc. You get a tidy image of that window alone, with no desktop or taskbar around it. Paste it into Paint or any app that accepts images.
On a laptop, you may need Fn
On many laptops, Print Screen shares a key with another function, like Insert or an arrow. If pressing it does nothing, hold Fn while you press it. Some laptops also let you flip the behavior with an Fn Lock key.
Why Print Screen sometimes opens the snipping bar
On many Windows 11 PCs, pressing PrtSc now opens the same overlay as Win + Shift + S instead of silently copying the screen. That's controlled by one setting, and you can change it whichever way you prefer.
Mockup: the Print Screen setting. Turn it off if you prefer the classic copy-to-clipboard behavior.
3. The Snipping Tool app: edit, delay and annotate
Everything above is really the Snipping Tool at work. But opening the app itself unlocks a few extras. Press the Start button, type Snipping Tool and hit Enter.
Mockup: a screenshot opened in the Snipping Tool editor with a pen arrow and a highlight added.
What you can do in the editor
- Crop: trim away anything you don't want to share.
- Draw and highlight: circle an error, underline a button, or highlight a line of text.
- Ruler: draw straight lines or measure angles when you need neat arrows.
- Text actions: pull the text out of a screenshot so you can copy it, and hide sensitive details like email addresses before you share the image.
- Save, copy or share: send it to another app or save it in the format you need.
The delay trick for menus that disappear
Some things vanish the moment you click away, like right-click menus, tooltips or a drop-down list. If you press a shortcut, the menu closes before the capture happens. The fix is the delay option inside the app.
The app's settings (the gear icon) also let you decide whether screenshots are saved automatically, whether to add a border, and whether edits get copied to the clipboard. It's worth a minute to set these to your liking.
4. Recording your screen instead
Sometimes a still image isn't enough. If you want to show someone how to do something, a short video is far clearer. On current versions of Windows 11, the same Snipping Tool can record your screen.
Press Win + Shift + R, drag a rectangle over the area you want, and click Start. Click Stop when you're done. The result is an MP4 file, usually saved in Videos > Screen Recordings, which you can play right away or send to anyone.
Before you record, close anything with personal details, like open emails or banking pages. A screen recording captures everything inside the selected area, including notifications that pop up halfway through.
5. Xbox Game Bar, tablets and browser captures
Xbox Game Bar
Windows 11 includes the Xbox Game Bar, built mainly for gamers but useful for anyone. Press Win + G to open it, then click the camera icon in the Capture widget. To skip the menu, press Win + Alt + PrtSc to grab the active window. These screenshots go to Videos > Captures.
Mockup: the Capture widget in the Xbox Game Bar.
Tablets and 2-in-1 devices
No keyboard? On a Surface, press Power + Volume Up together. On other tablets, try Windows button + Volume Down. The screen flashes and the image is saved to your Screenshots folder.
Capturing a whole web page
Windows itself can't take a scrolling screenshot. In Microsoft Edge, though, you can press Ctrl + Shift + S to open Web capture, which can grab an entire page in one image. Other browsers have similar tools, often hidden in their developer menus.
6. Where your screenshots are saved
This trips people up more than any other part of the process. The short answer: it depends on the method.
- Win + PrtSc saves to Pictures > Screenshots.
- PrtSc and Alt + PrtSc save nothing. They only copy the image, so you have to paste it.
- Win + Shift + S copies to the clipboard and, on current versions, keeps a copy in Pictures > Screenshots.
- Game Bar saves to Videos > Captures.
Mockup: the Screenshots folder, with the two naming styles you'll see.
If OneDrive backs up your Pictures folder, your screenshots may be in OneDrive > Pictures > Screenshots instead. That's a common reason people think their files have vanished.
Moving the Screenshots folder
Want your screenshots somewhere else, like a Desktop folder or a second drive? Open Pictures, right-click the Screenshots folder, choose Properties, open the Location tab, click Move and pick the new folder. Windows will ask if you want to move the existing files too.
7. Which method should you use?
There's no single right answer. Here's how I'd choose, depending on what you need:
| You want to… | Use |
|---|---|
| Grab part of the screen and paste it quickly | Win + Shift + S |
| Save the whole screen as a file with one press | Win + PrtSc |
| Copy a single clean window | Alt + PrtSc |
| Annotate or hide private info before sharing | Snipping Tool app |
| Capture a menu that vanishes | Snipping Tool with a delay |
| Show a process in motion | Win + Shift + R |
| Capture a game window | Win + Alt + PrtSc |
If you want more than the built-in tools offer, two free programs are popular. ShareX is free and open source, and can capture scrolling windows, add automatic uploads and more. Greenshot is a lighter free option with a handy built-in editor. Most people don't need either, but they're good to know about.
8. When a screenshot doesn't work
Nothing seems to happen when you press Print Screen
Remember that PrtSc only copies the image. Open Paint or a document and press Ctrl + V to see if it's there. On a laptop, try Fn + PrtSc. If the snipping bar opens instead, that's the setting from section 2.
The screenshot comes out black
Streaming services and some video players protect their content, so the picture can show up as a black rectangle. That's by design and there's no clean workaround. Everything around the video should still capture normally.
The Snipping Tool won't open or behaves strangely
Restart your PC first. If that doesn't help, open Settings > Apps > Installed apps, find Snipping Tool, choose Advanced options and click Repair. You can also update it from the Microsoft Store.
The mouse pointer is missing
Screenshots usually leave out the cursor. If you need it in the picture, a short screen recording or a tool like ShareX is a better fit.
You have more than one monitor
Print Screen grabs all your displays as one wide image. If you only want one screen, use Win + Shift + S and drag over just that monitor.
9. My experience
I tried every method in this guide on a desktop PC with two monitors and on a laptop, both running Windows 11 24H2. For day-to-day use, Win + Shift + S won easily. After a week I stopped thinking about the other shortcuts and just used that one, mostly for sending quick pictures of settings pages to friends.
The laptop was the first surprise. Print Screen did nothing until I held Fn, and I wasted a few minutes thinking the key was broken. It wasn't. If you're on a laptop and nothing happens, try Fn first.
The second surprise was OneDrive. My Win + PrtSc files weren't in the local Screenshots folder at all, because Pictures was being backed up and everything had gone to the OneDrive version. Once I knew where to look, it was easy.
The delay feature saved me too. I needed a picture of a right-click menu, tried the shortcut three times and kept losing the menu. A 5-second delay in the Snipping Tool solved it on the first attempt.
One failure: a screenshot of a streaming video came out as a black box, exactly as described above. File sizes were small for simple windows, a few hundred KB, and reached a couple of MB for a busy web page on a large monitor.
💬 Comments